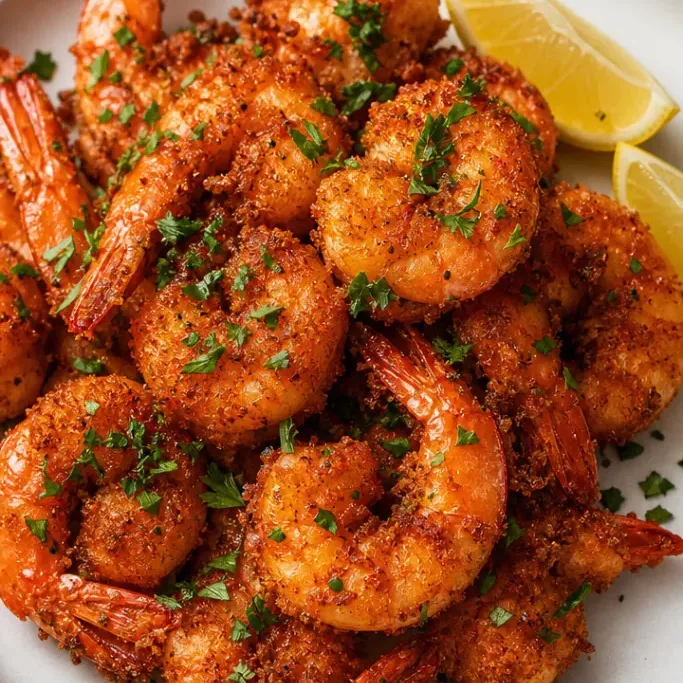
Texas Roadhouse Shrimp Easy Copycat Recipe
This Texas Roadhouse shrimp recipe brings the restaurant’s seasoned, crispy shrimp home in about 30 minutes, no reservation needed.
The shrimp get a well-seasoned flour coating and a quick fry that gives you crunchy edges with tender, juicy insides. It’s the kind of weeknight dinner that feels like more effort than it actually is.
Why I Love This Recipe
The seasoning blend is what makes this one worth coming back to. It’s savory with a little heat and a hint of garlic, the kind of thing that makes plain fried shrimp taste like it came from somewhere with a proper kitchen.
The coating stays crisp even after a few minutes on the plate, which matters when you’re eating with other people and not shoveling it solo over the sink.
Recipe Ingredients
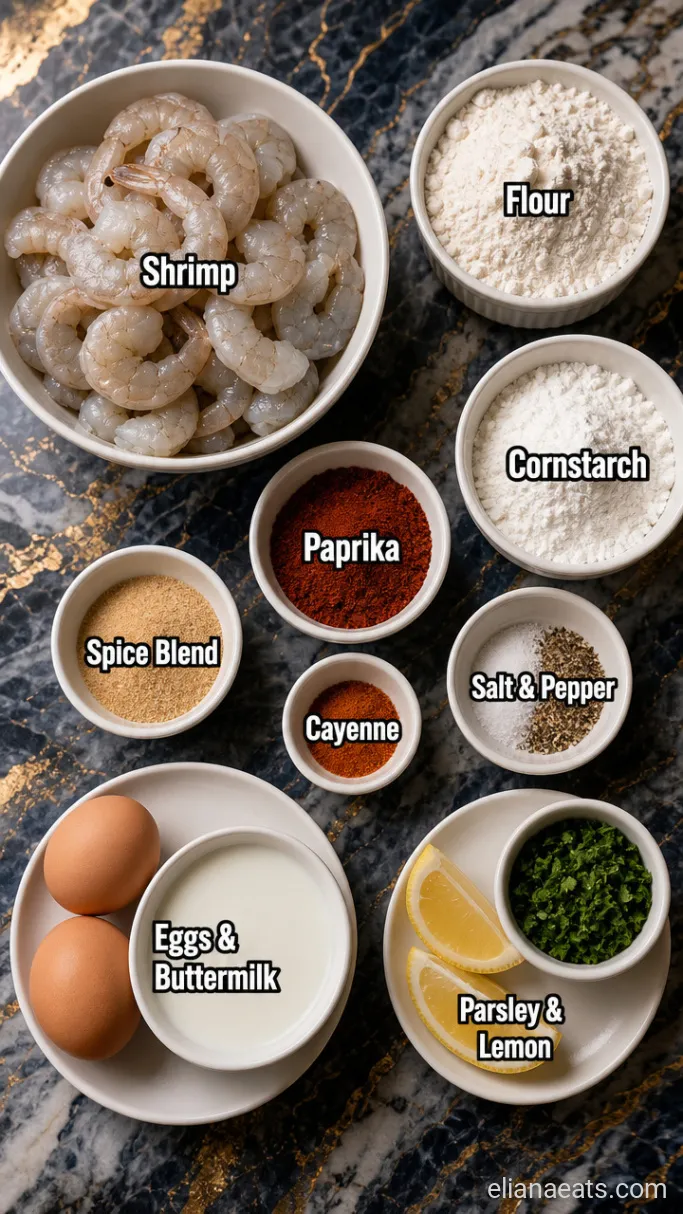
- 1 lb large shrimp (21/25 count) – Peeled and deveined; fresh or thawed frozen both work fine
- 1 cup all-purpose flour – The base of the coating
- 1/4 cup cornstarch – Adds extra crunch to the crust
- 1 tsp garlic powder – Core part of the seasoning blend
- 1 tsp onion powder – Rounds out the savory base
- 1 tsp smoked paprika – Gives color and a subtle smoky note
- 1/2 tsp cayenne pepper – Adjust down if you want less heat
- 1 tsp salt – Season the coating, not just the shrimp
- 1/2 tsp black pepper – Freshly ground if you have it
- 2 large eggs – Beaten, helps the coating stick
- 1/4 cup buttermilk – Keeps the batter coating light and helps it cling
- Vegetable oil for frying – Enough to fill your pan about 2 inches deep; canola works too
- 1 lemon, cut into wedges – For serving
- 2 tbsp fresh parsley, chopped – For garnish
Variations / Substitutions
- No buttermilk – Mix 1/4 cup regular milk with 3/4 tsp white vinegar and let it sit for 5 minutes; it behaves the same way in the coating.
- Less heat – Drop the cayenne to 1/4 tsp or leave it out entirely; the garlic and smoked paprika carry the flavor on their own.
- Extra smoky – Swap the smoked paprika for chipotle powder for a deeper, earthier heat rather than a bright one.
- Air fryer – Spray the coated shrimp well with oil and cook at 400°F (200°C) for 8 to 10 minutes, flipping halfway; the crust won’t be quite as crunchy but it’s a solid weeknight shortcut.
- Gluten-free – Use a 1:1 gluten-free flour blend and the coating holds together well.
- Shrimp cocktail fans – If you like shrimp with a tangy dipping sauce, the Texas Roadhouse Cocktail Sauce Copycat Recipe is worth making alongside this one.
How To Make Texas Roadhouse Shrimp
Step 1: Season the Flour Coating
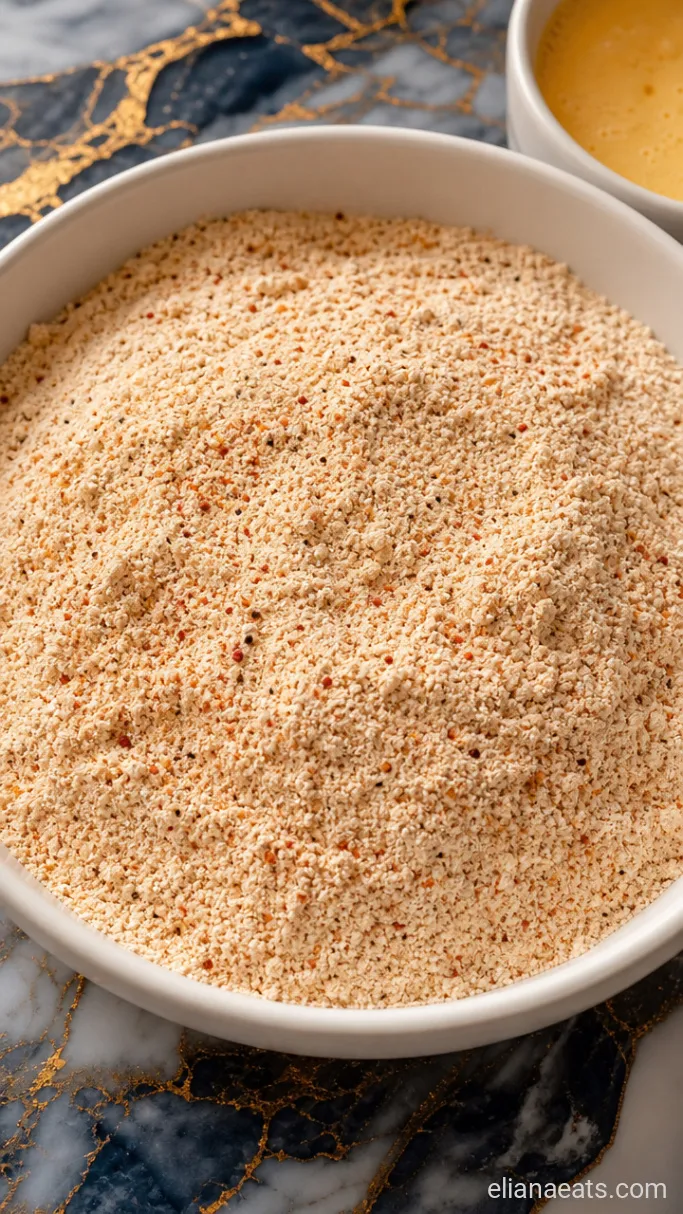
In a wide shallow bowl, whisk together the 1 cup all-purpose flour, 1/4 cup cornstarch, 1 tsp garlic powder, 1 tsp onion powder, 1 tsp smoked paprika, 1/2 tsp cayenne pepper, 1 tsp salt, and 1/2 tsp black pepper until everything is evenly combined. In a separate bowl, beat the 2 large eggs with the 1/4 cup buttermilk until smooth.
You want the dry mix to look uniformly orange-pink from the paprika, with no white clumps of flour sitting at the bottom. That’s your sign it’s properly blended and will season every shrimp evenly.
Step 2: Dredge the Shrimp
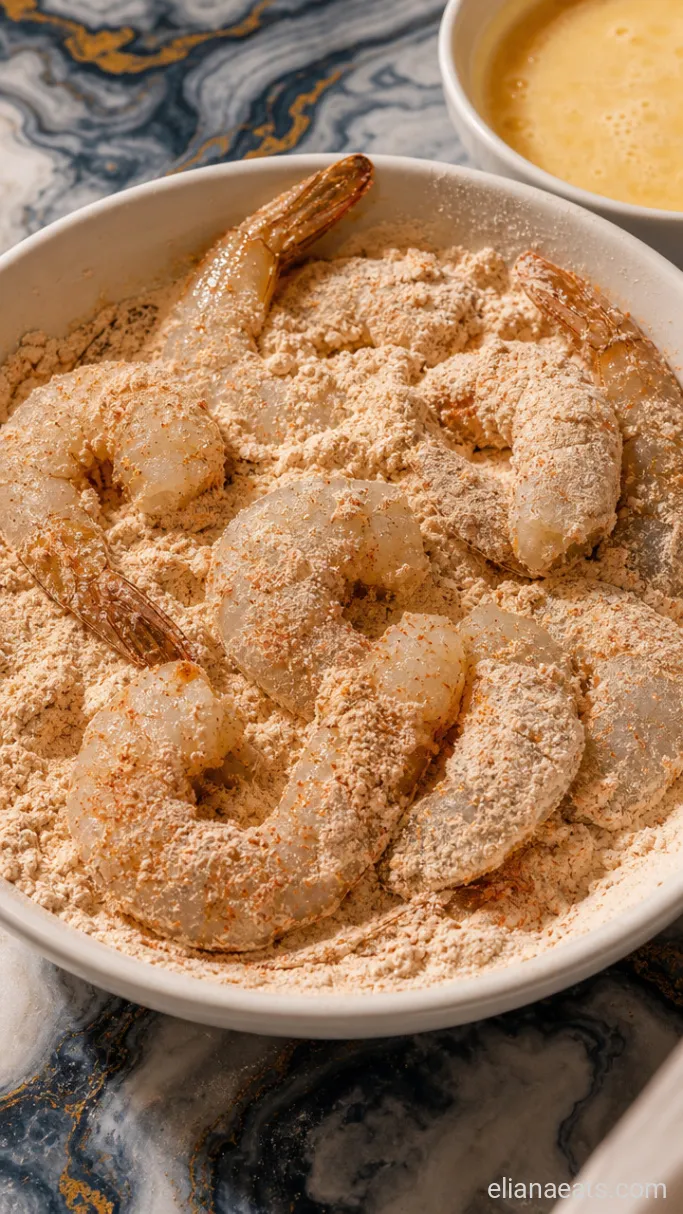
Working with a few shrimp at a time, dip each one into the egg and buttermilk mixture, letting any excess drip off, then press it into the seasoned flour. Flip it and press again so the coating covers every surface, including the thicker part near the tail. Set the coated shrimp on a wire rack or a plate while you finish the rest.
The coating should look dry and powdery on the outside, not wet or gummy. If you see wet patches, press a little more flour onto those spots before they go in the oil.
Step 3: Fry the Shrimp
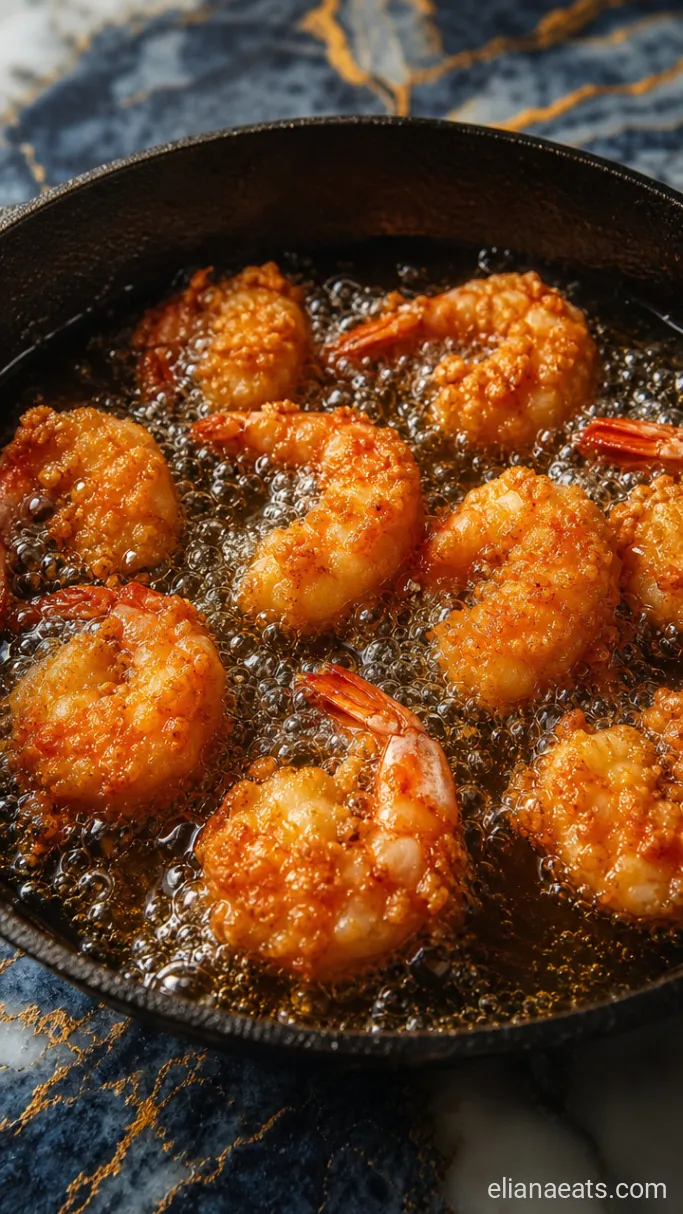
Pour enough vegetable oil into a heavy-bottomed pan to reach about 2 inches deep. Heat it over medium-high until it reaches 350°F (175°C), which takes roughly 5 to 7 minutes. Add the shrimp in a single layer without crowding the pan, working in 2 to 3 batches if needed, and fry for 2 to 3 minutes total, turning once at the halfway point.
The shrimp are done when the coating is deep golden and the shrimp have curled into a tight C shape. An overcooked shrimp curls into a tight O, so pull them out while they still have a little give.
Don’t rush the oil temperature. Oil that’s too cool soaks into the coating instead of crisping it, and you end up with something heavy rather than light and crunchy. A kitchen thermometer is genuinely useful here.
Step 4: Drain and Garnish the Shrimp
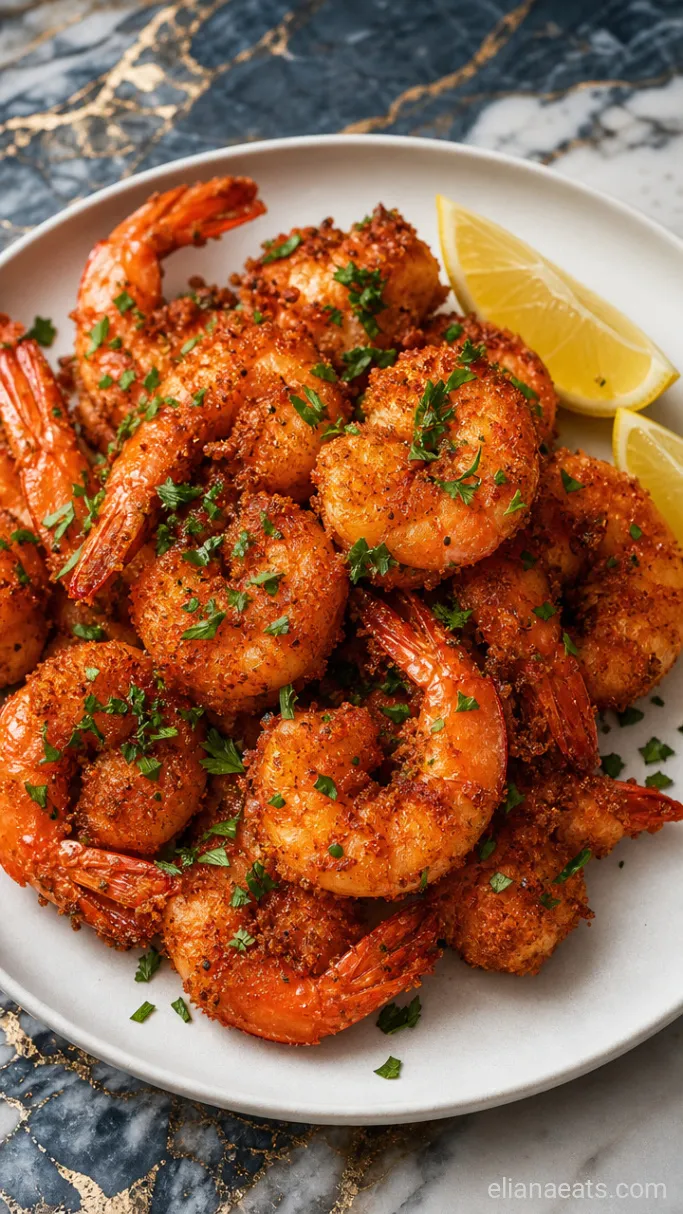
Using a slotted spoon or spider, lift the fried shrimp out of the oil and set them on a wire rack or a paper-towel-lined plate for about 1 minute to drain. Transfer them to a serving platter, scatter the 2 tbsp chopped fresh parsley over the top, and arrange the lemon wedges alongside for squeezing.
Recipe Tips
- Pat the shrimp dry before you start. Moisture on the surface of the shrimp makes the coating slide off. A few seconds with a paper towel makes a real difference.
- Rest the coated shrimp for 5 minutes before frying. Letting them sit on the rack after dredging gives the flour time to hydrate slightly and grip the shrimp more securely.
- Bring the shrimp to room temperature first. Cold shrimp straight from the fridge can drop the oil temperature quickly, especially in a smaller pan. Pull them out 10 minutes before you plan to fry.
- Check oil temperature between batches. It recovers fast, but giving it 60 seconds between rounds keeps the crust consistent across every shrimp.
Cook times by thickness and shrimp size:
| Shrimp Size | Count Per Lb | Fry Time Per Batch |
|---|---|---|
| Medium | 41/50 | 1.5 to 2 minutes |
| Large | 21/25 | 2 to 3 minutes |
| Jumbo | 16/20 | 3 to 4 minutes |
How To Store
- Refrigerate – Store leftover shrimp in an airtight container for up to 2 days.
- Reheating – Spread them on a wire rack set over a baking sheet and bake at 375°F (190°C) for 6 to 8 minutes. This brings the crust back to life far better than a microwave, which just steams them soft.
What To Serve With Texas Roadhouse Shrimp
A crisp coleslaw works well here because the cool, creamy crunch cuts through the richness of the fried coating. Seasoned steak fries or thin-cut fries are a natural match since they let the shrimp stay the main event rather than competing with a heavier side. If you want something that feels a bit lighter, a simple green salad dressed with lemon vinaigrette echoes the lemon wedges already on the plate and keeps the whole meal from feeling heavy.
Frequently Asked Questions
Can I make the seasoned flour coating ahead of time?
Yes. Mix the dry ingredients up to a week in advance and store them in a sealed jar at room temperature. Just give it a quick shake before using.
Do I need a deep fryer, or will a regular pan work?
A heavy-bottomed skillet or Dutch oven works well. You just need enough oil for the shrimp to float freely, about 2 inches deep.
Can I use pre-cooked shrimp?
No. Pre-cooked shrimp will overcook and turn rubbery by the time the coating crisps. Raw shrimp is the only way to get the right texture.
How do I keep the first batch warm while I fry the rest?
Place the drained shrimp on a wire rack on a baking sheet in a 200°F (95°C) oven. They’ll hold for up to 15 minutes without losing their crunch.
—
Texas Roadhouse Shrimp Recipe
Ingredients
Method
- Whisk together the flour, cornstarch, garlic powder, onion powder, smoked paprika, cayenne, salt, and black pepper in a wide shallow bowl. Beat the eggs and buttermilk together in a separate bowl.
- Dip each shrimp in the egg mixture, let the excess drip off, then press firmly into the seasoned flour on both sides. Set on a wire rack and rest for 5 minutes.
- Heat 2 inches of vegetable oil in a heavy-bottomed pan to 350°F (175°C) over medium-high. Fry the shrimp in batches for 2 to 3 minutes, turning once, until the coating is deep golden and the shrimp are curled into a tight C shape.
- Drain the shrimp on a wire rack or paper-towel-lined plate for 1 minute, then transfer to a serving platter, scatter the chopped parsley over the top, and add the lemon wedges alongside.