Starbucks Snowman Cookie Copycat Recipe
The Starbucks snowman cookie recipe is one of those holiday treats worth making at home, mostly because you can get the same thick, soft sugar cookie with white royal icing and a tiny fondant scarf without paying café prices. These show up every winter at Starbucks and disappear fast, so having a version you can bake in your own kitchen means you’re not at the mercy of the seasonal menu.
They’re a solid project for a weekend afternoon, and they’re genuinely fun to decorate.
Why I Love This Recipe
The cookie itself is dense and soft, more like a shortbread-adjacent sugar cookie than a crispy cutout. That texture holds up under the thick layer of royal icing without going soggy.
The icing sets firm enough to stack the cookies, which makes them easy to box up as gifts.
I keep coming back to this version because the proportions of flour to butter give you a cookie that doesn’t spread in the oven, so your snowman actually looks like a snowman when it comes out.
Recipe Ingredients
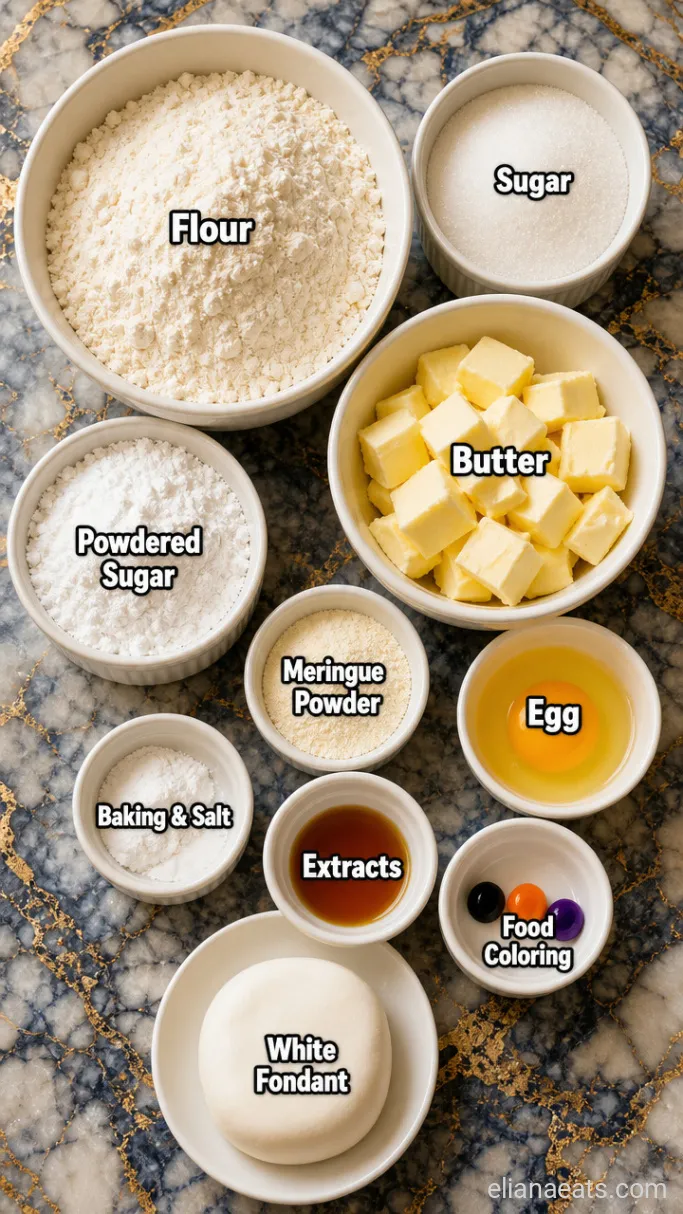
- 2 3/4 cups all-purpose flour – Spooned and leveled, not scooped, to avoid a dense dough
- 1/2 tsp baking powder – Gives a slight lift without making the cookie cakey
- 1/4 tsp salt – Balances the sweetness
- 1 cup (2 sticks) unsalted butter, room temperature – Room temp is non-negotiable for a smooth dough; salted butter works but skip the added salt
- 3/4 cup granulated sugar – White sugar keeps the color clean for icing
- 1 large egg – Binds the dough
- 1 tsp vanilla extract – Use pure, not imitation, for the cleanest flavor
- 1/2 tsp almond extract – This is the background note that makes the cookie taste bakery-style; skip it if you have a nut allergy
- 3 cups powdered sugar – For the royal icing base
- 2 tbsp meringue powder – Gives the icing its firm, stackable set; find it in the baking aisle or craft stores
- 5 to 6 tbsp water – Added gradually to reach the right icing consistency
- Black gel food coloring – For the eyes and buttons; gel stays vivid, liquid food coloring will dilute the icing
- Orange gel food coloring – For the carrot nose
- Red and blue gel food coloring – Mixed together to make the scarf purple, or use pre-mixed purple fondant
- 2 oz white fondant – For the scarf detail; store-bought fondant works fine here
Variations / Substitutions
- Butter swap – Replace butter with a plant-based stick butter (not spread) and the dough will behave nearly the same; the cookie will be slightly less rich.
- Almond extract – Leave it out entirely or swap it for 1/2 tsp lemon extract for a brighter, citrusy background flavor.
- Egg-free – Use 1 tbsp of aquafaba in place of the egg; the dough will be just slightly softer, so chill it for an extra 15 minutes before rolling.
- Meringue powder swap – Use 1 1/2 tbsp pasteurized egg whites from a carton instead; the icing will set firm but may take a bit longer to dry.
- Fondant scarf – Skip the fondant and pipe the scarf with stiff royal icing tinted with red and blue gel instead.
- Sprinkle buttons – Black nonpareils pressed into the wet icing work just as well as piped dots for the buttons.
If you like decorating with royal icing, the Copycat Starbucks Sugar Cookie with Royal Icing Recipe uses the same base dough in a round shape and is a good starting point before tackling a more detailed cutout.
How To Make Snowman Cookies
Step 1: Beat the Butter and Sugar
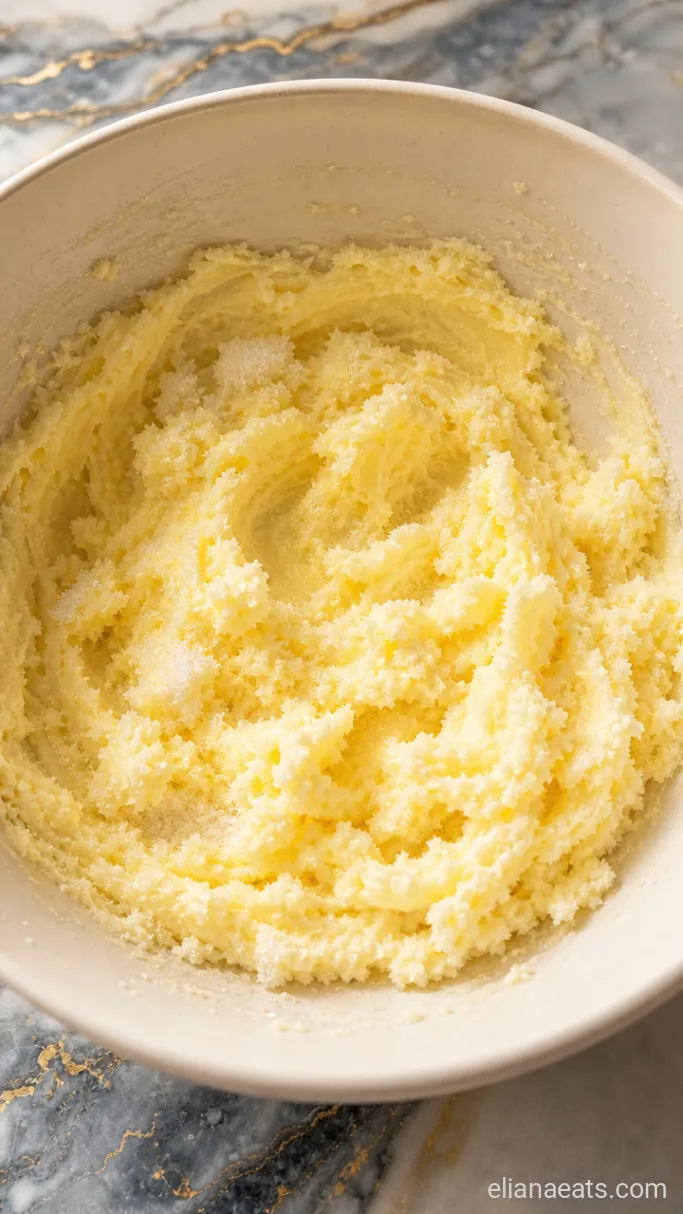
In a large bowl, beat the 1 cup of room-temperature unsalted butter and 3/4 cup of granulated sugar together on medium speed for about 3 minutes, until the mixture looks pale and slightly fluffy. Add the 1 large egg, 1 tsp of vanilla extract, and 1/2 tsp of almond extract, then beat for another 30 seconds until everything is combined.
The butter and sugar should look noticeably lighter in color than when you started, almost cream-colored. If it still looks yellow and dense, give it another minute.
Step 2: Mix the Dough
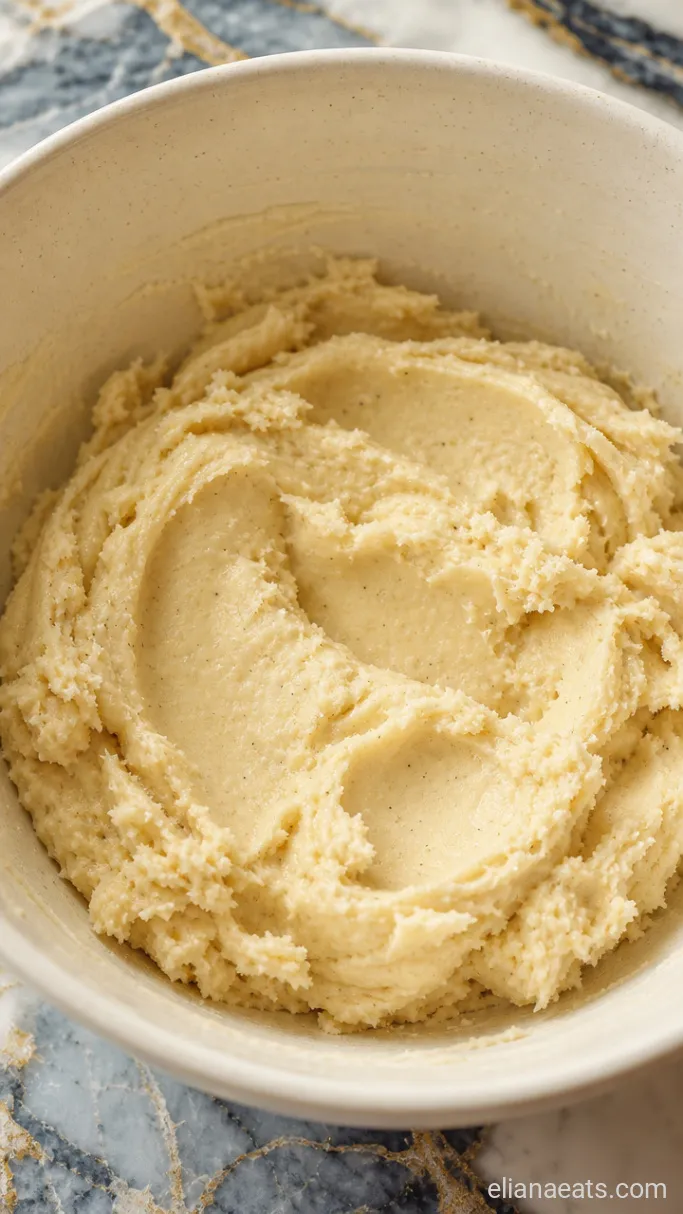
Add the 2 3/4 cups of all-purpose flour, 1/2 tsp of baking powder, and 1/4 tsp of salt to the butter mixture. Mix on low speed just until no dry streaks remain, about 45 seconds. Do not overmix once the flour goes in, or the cookies will be tough.
The dough will be soft but not sticky. It should hold its shape when you press a piece between your fingers without crumbling apart.
Step 3: Chill and Roll the Dough
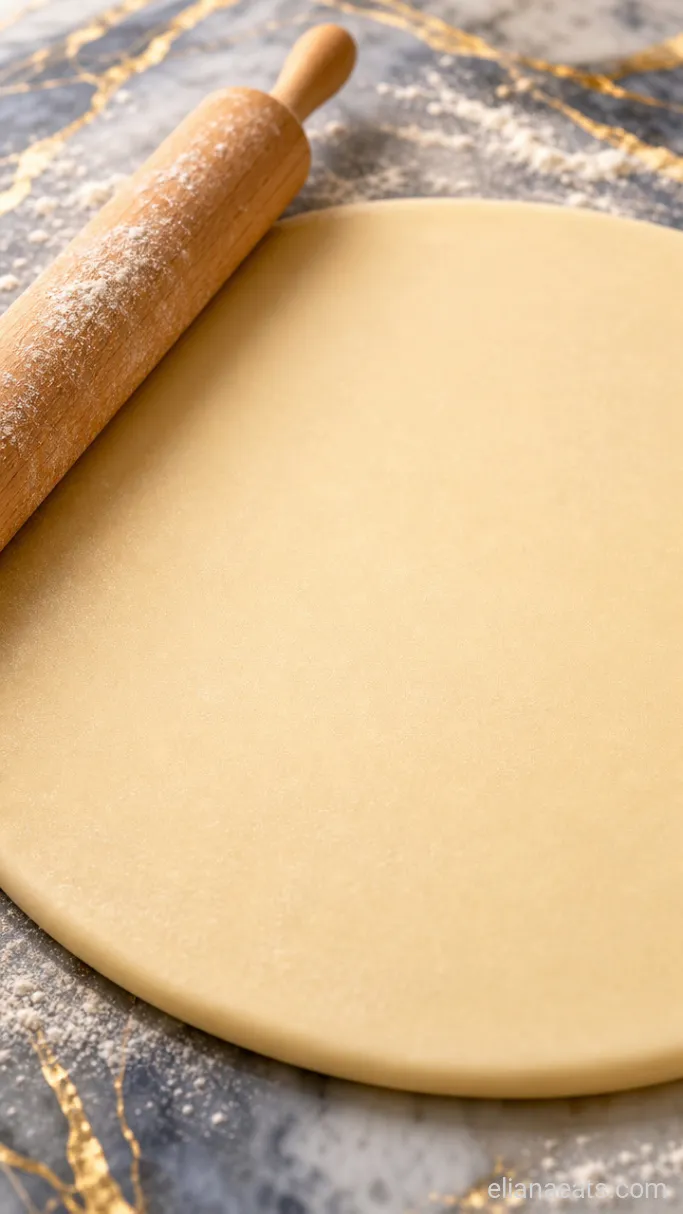
Flatten the dough into a disk, wrap it in plastic wrap, and refrigerate it for at least 1 hour. Once chilled, preheat your oven to 375°F (190°C) and line 2 baking sheets with parchment paper. Roll the dough out on a lightly floured surface to about 1/4-inch thickness.
Cold dough holds its shape through the rolling and cutting process. If it starts warming up and sticking to the surface, slide it back into the fridge for 10 minutes before continuing.
Step 4: Cut and Bake the Snowmen
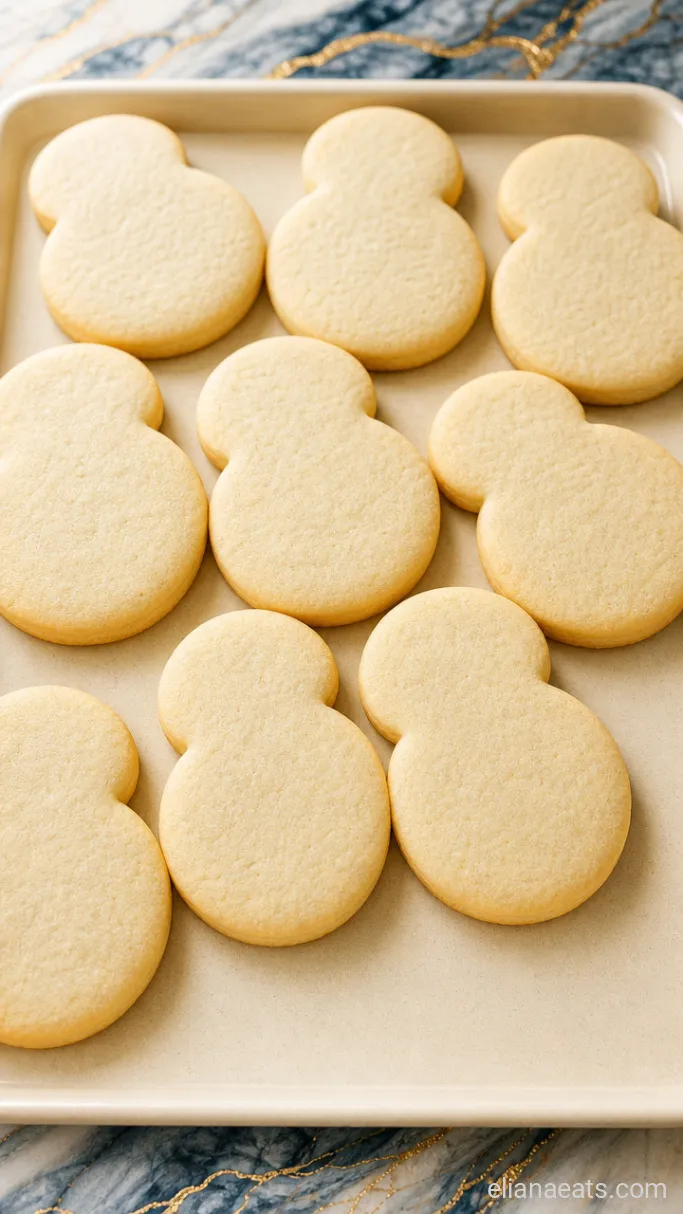
Press a snowman-shaped cookie cutter firmly into the rolled dough, cutting as close together as you can to minimize scraps. Transfer the cutouts to the prepared baking sheets, spacing them about 1 inch apart. Bake at 375°F (190°C) for 9 to 11 minutes, until the edges are just set and the bottoms are very lightly golden, but the tops still look matte and pale.
Pull them out while they still look slightly underdone in the center. They firm up as they cool, and a fully golden top at this point means a dry cookie by the time you eat it. Cool them on the baking sheet for 5 minutes, then transfer to a wire rack and cool completely before icing, at least 30 minutes.
Step 5: Whisk the Royal Icing

In a bowl, whisk together the 3 cups of powdered sugar and 2 tbsp of meringue powder. Add 5 tbsp of water and whisk on medium-high speed for about 3 to 4 minutes, until the icing is bright white, thick, and holds a ribbon that disappears back into itself in about 10 seconds. Add the remaining 1 tbsp of water only if the icing feels too stiff to pipe smoothly.
At this stage, the icing is at “flood” consistency, which is what you want for covering the cookie’s surface. If you need stiffer icing for detail work, hold back 1/2 cup and add only 4 tbsp of water to the rest.
Step 6: Ice and Decorate the Snowmen
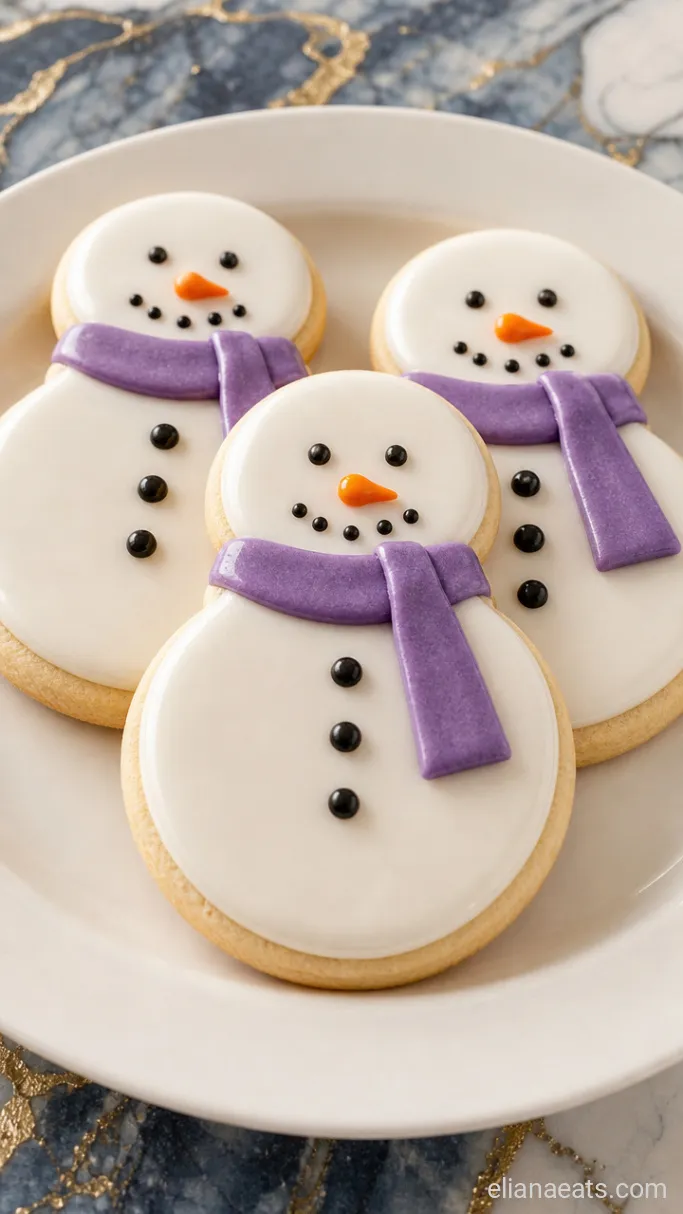
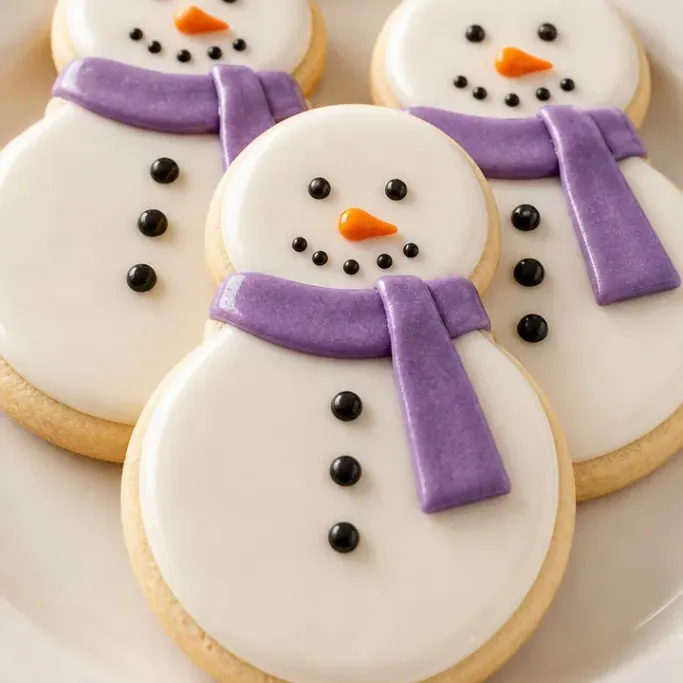
Spread or pipe a generous layer of the white royal icing over each cooled cookie, covering it to the edges. Let the base coat dry for at least 20 minutes at room temperature before adding details. Using small piping bags or the tip of a toothpick, add black gel-tinted icing dots for the 2 eyes and 3 buttons, and a small orange gel-tinted triangle for the carrot nose.
Roll the 2 oz of white fondant thin, tint small pieces with red and blue gel food coloring to get a purple, and cut a thin strip to drape across the snowman’s neck as the scarf. Press it gently onto the icing so it adheres. Arrange the finished cookies on a plate or tiered stand with the scarf detail facing forward.
Recipe Tips
- Room temperature butter matters more than you think. Cold butter won’t cream properly and you’ll end up with a lumpy dough that bakes unevenly. If you forgot to pull it out ahead of time, cut it into small cubes and let it sit for 20 to 25 minutes.
- Spoon and level your flour. Scooping directly from the bag packs in extra flour, which makes the dough stiff and the cookies dry.
- Keep one scraps-free sheet. Re-rolled dough is slightly tougher than first-roll dough. Keep your best snowman shapes from the first roll and use the re-rolled scraps for test cookies or family snacking.
- Gel food coloring only. A small drop of black gel goes a long way and won’t thin out your icing the way liquid dye does.
- Icing consistency is everything. Drag a knife through the icing surface and count to 10. If the line disappears in 10 seconds, you’re at flood consistency. Faster means too thin; slower means too thick.
Bake times by pan (at 375°F / 190°C, dough rolled to 1/4 inch):
| Pan Material | Cookie Size | Bake Time |
|---|---|---|
| Light aluminum | Standard snowman (4 in) | 9 to 10 minutes |
| Dark nonstick | Standard snowman (4 in) | 8 to 9 minutes |
| Light aluminum | Large snowman (6 in) | 11 to 12 minutes |
| Dark nonstick | Large snowman (6 in) | 10 to 11 minutes |
How To Store
- Refrigerate – Store undecorated cookies in an airtight container at room temperature for up to 5 days. Decorated cookies can also be stored at room temperature, loosely covered, for up to 4 days. Refrigerating decorated cookies can cause the icing to sweat and get sticky.
- Serve Cold – These actually taste good straight from the fridge before the icing is applied, but once decorated, room temperature is the better call.
What To Serve With Snowman Cookies
A mug of hot cocoa is the obvious pairing, but it works because the bitterness of a good dark cocoa cuts through the sweetness of the royal icing without competing with the vanilla in the cookie. A lightly spiced chai latte does the same job and adds a warm cardamom note that plays nicely against the almond extract in the dough. If you’re putting these out at a cookie exchange, a small pot of unsweetened coffee keeps the sweetness from feeling like too much after a few bites.
Frequently Asked Questions
Can I make the dough ahead of time?
Yes. The wrapped dough disk keeps in the refrigerator for up to 3 days, or you can freeze it for up to 1 month. Thaw frozen dough overnight in the fridge before rolling.
My icing isn’t setting firm. What went wrong?
It’s almost always too much water. Add powdered sugar 1 tbsp at a time, whisk well, and test the 10-second ribbon again before adding more.
Can I use a snowman cutter from any brand?
Any metal or plastic snowman cutter works. A cutter around 3.5 to 4 inches gives you the best proportions for the scarf and facial details without running out of space.
Do I need a stand mixer?
No. A hand mixer works fine for both the cookie dough and the royal icing. Whisking the icing by hand is possible but tiring, and you’ll need a full 6 to 8 minutes to get the same consistency.
—
Ingredients
Method
- Beat the 1 cup of unsalted butter and 3/4 cup of granulated sugar on medium speed for 3 minutes until pale. Add the 1 large egg, 1 tsp vanilla extract, and 1/2 tsp almond extract and beat for 30 more seconds.
- Add the 2 3/4 cups of flour, 1/2 tsp baking powder, and 1/4 tsp salt. Mix on low for about 45 seconds until no dry streaks remain.
- Wrap the dough in plastic wrap, flatten into a disk, and refrigerate for 1 hour. Preheat oven to 375°F (190°C) and line 2 baking sheets with parchment. Roll the chilled dough to 1/4-inch thickness on a lightly floured surface.
- Cut snowman shapes and transfer to the prepared baking sheets 1 inch apart. Bake at 375°F (190°C) for 9 to 11 minutes until edges are set and bottoms are lightly golden. Cool on the pan for 5 minutes, then transfer to a wire rack and cool completely.
- Whisk the 3 cups of powdered sugar and 2 tbsp of meringue powder, then add 5 to 6 tbsp of water and whisk for 3 to 4 minutes until the icing is smooth, white, and reaches flood consistency.
- Ice each cookie with the white royal icing and let it dry for 20 minutes. Add black gel-tinted icing dots for eyes and buttons, an orange gel-tinted nose, and a fondant scarf tinted with red and blue gel. Arrange on a plate with the scarf facing forward.