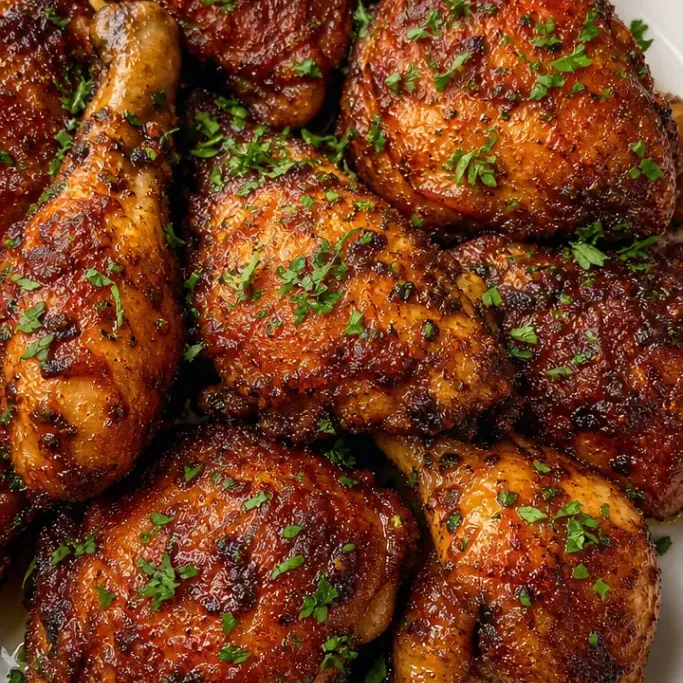
KFC Original Recipe Chicken (Easy Gluten Free Copycat)
This gluten free KFC chicken recipe gives you that iconic crispy, spiced coating without a speck of wheat flour. It’s the one to make when the craving hits and you want something real on the table, not a sad substitute.
It takes about 45 minutes start to finish, and everything you need is probably already in your spice drawer.
Why I Love This Recipe
The coating stays genuinely crunchy, not just crunchy-for-two-minutes. Rice flour and a little cornstarch together do what gluten free breadings often fail to do: hold their crisp through the whole meal.
The spice blend is heavy on savory and a little smoky, with enough black pepper and garlic to taste like the real thing rather than a diet version.
This is the version I keep coming back to because it works every time, even if the oil temperature dips a little or I leave a piece in the pan an extra minute.
Recipe Ingredients
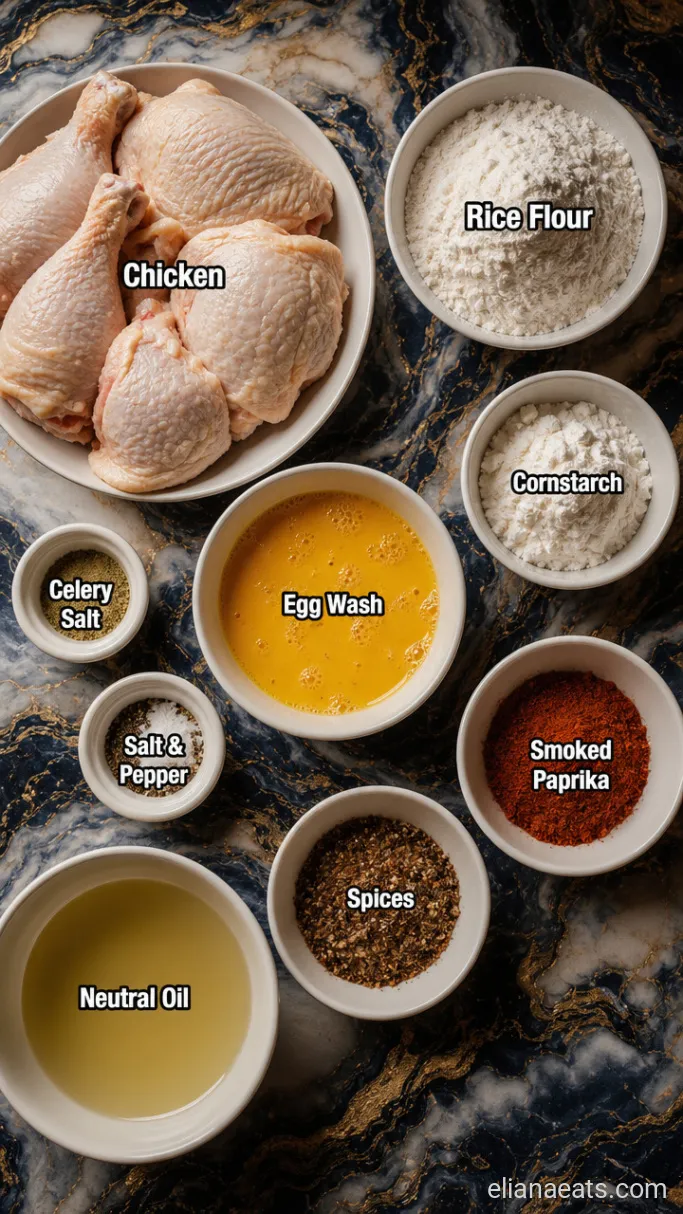
- 2 lbs chicken pieces (bone-in, skin-on) – Thighs and drumsticks hold moisture best during frying; breasts work but watch the time
- 1 cup rice flour – The backbone of the gluten free coating; gives a lighter crisp than a heavier flour
- 3 tbsp cornstarch – Helps the crust shatter rather than bend when you bite into it
- 2 tsp fine sea salt – Fine grain dissolves into the coating evenly
- 1 tsp black pepper – Freshly ground if you have it
- 1 tsp smoked paprika – Adds color and that mild smoky undertone
- 1 tsp garlic powder – Not garlic salt; you already have salt covered
- 1 tsp onion powder – Rounds out the savory base
- 1/2 tsp dried thyme – One of the classic herb notes in the original blend
- 1/2 tsp dried oregano – Works alongside thyme for a subtle herbal background
- 1/2 tsp celery salt – A small amount goes a long way; don’t skip it
- 1/4 tsp cayenne pepper – Mild heat, not fiery; cut it to 1/8 tsp if you’re cooking for kids
- 2 large eggs – Beaten; the binder that holds the coating to the chicken
- 2 tbsp whole milk – Loosens the egg wash slightly so it coats evenly; use any dairy-free milk to keep it dairy free
- Neutral oil for frying – Vegetable, canola, or avocado oil; you need about 3 to 4 cups depending on your pot
Variations / Substitutions
- Dairy-free – Swap the 2 tbsp whole milk for unsweetened oat milk or almond milk; the egg wash still binds just as well.
- Extra heat – Increase the cayenne to 1/2 tsp and add 1/4 tsp white pepper to the coating for a noticeable kick.
- Boneless thighs – You can use boneless, skinless chicken thighs; reduce fry time to about 6 minutes per side at the same temperature.
- Air fryer – Spray the coated pieces generously with cooking oil and air fry at 400°F (200°C) for 20 to 22 minutes, flipping once halfway; the crust won’t be quite as shatteringly crisp but still very good.
- Corn flour swap – Fine cornmeal can replace cornstarch in a pinch, though the texture will be very slightly grainier.
- Buttermilk brine – If you have time, soaking the chicken in gluten free buttermilk (lactose-free works) for 4 hours before coating makes the meat noticeably more tender.
If you enjoy this kind of gluten free fried comfort food, you might also like a Gluten Free Popeyes Chicken Sandwich Recipe.
How To Make KFC Chicken
Step 1: Coat the Chicken in the Spiced Flour
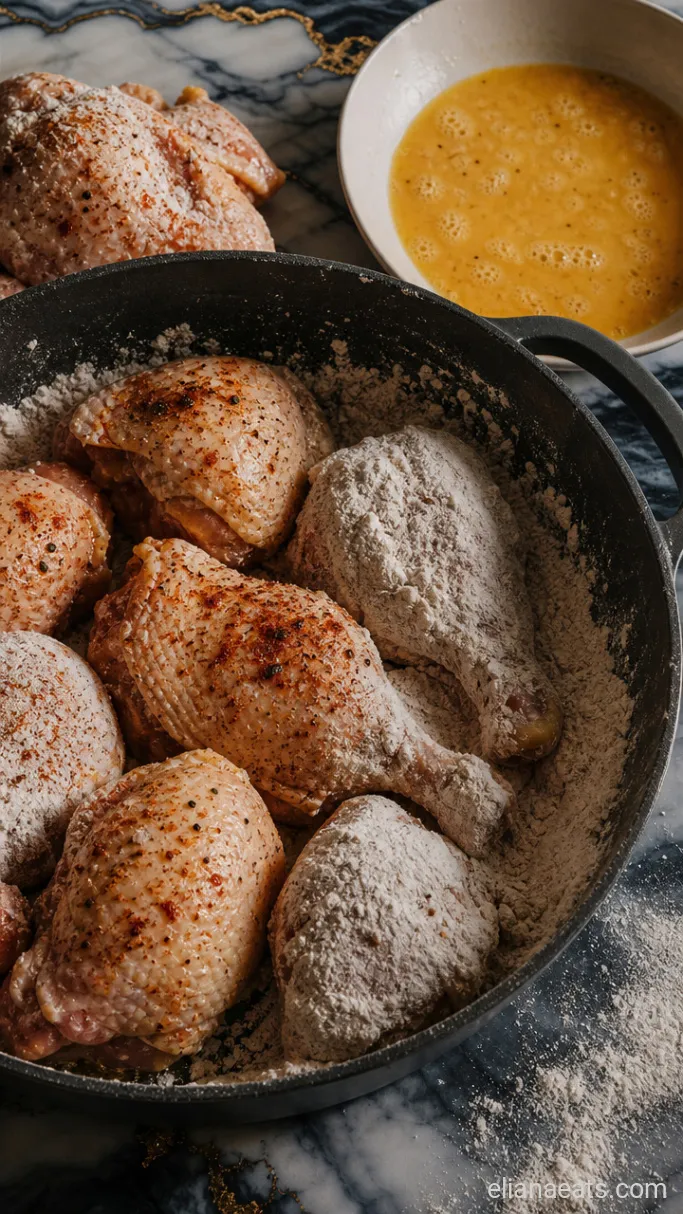
Set a wire rack over a baking sheet and put it near your work surface. In a wide, shallow bowl, whisk together the 1 cup rice flour, 3 tbsp cornstarch, 2 tsp fine sea salt, 1 tsp black pepper, 1 tsp smoked paprika, 1 tsp garlic powder, 1 tsp onion powder, 1/2 tsp dried thyme, 1/2 tsp dried oregano, 1/2 tsp celery salt, and 1/4 tsp cayenne until everything is evenly combined. In a second bowl, beat the 2 large eggs with the 2 tbsp whole milk.
Pat the 2 lbs chicken pieces completely dry with paper towels, then dip each piece in the egg wash, letting the excess drip off for a second. Press it firmly into the spiced flour, turning to coat all sides, and set it on the wire rack. Let the coated pieces rest on the rack for 10 minutes before frying.
That resting time matters. It lets the coating bond to the chicken so it doesn’t slide off the moment it hits the oil.
Step 2: Fry the Chicken to Golden and Cooked Through
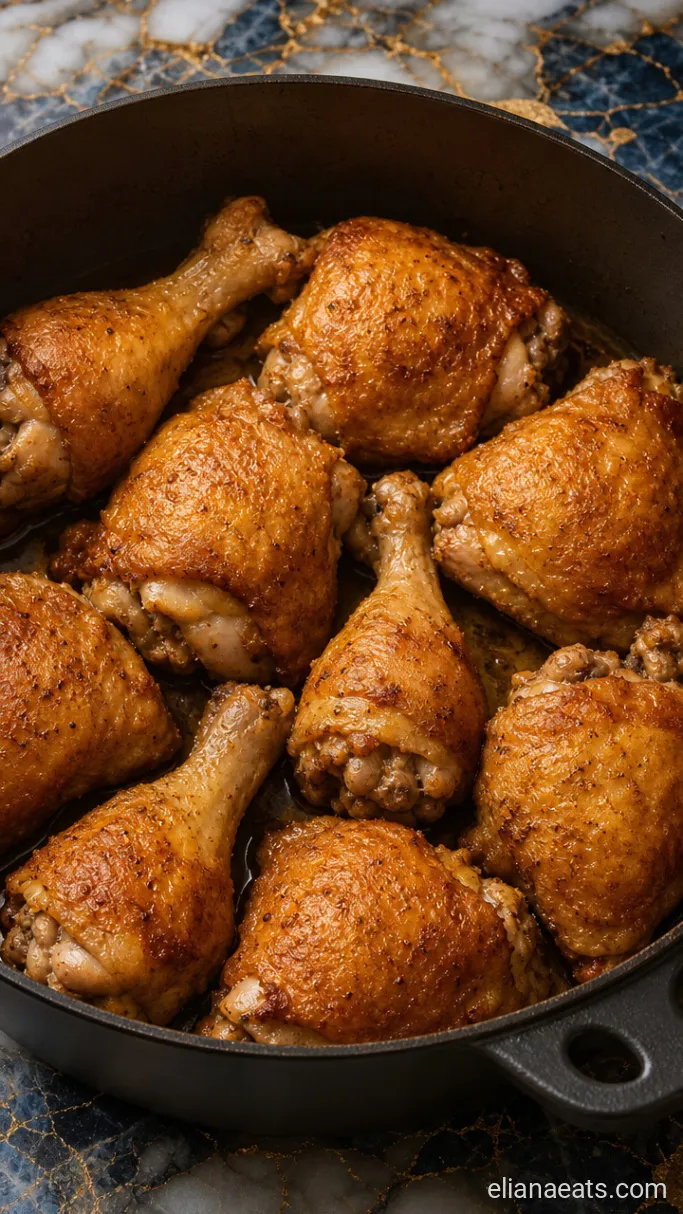
Pour enough neutral oil into a wide, heavy-bottomed pot or Dutch oven to come about 3 inches deep, then heat it over medium-high until it reaches 325°F (165°C) on a kitchen thermometer. Fry the chicken in batches of 2 to 3 pieces, bone-in side down first, for 12 to 14 minutes per side, turning once, until the crust is deep golden brown and the internal temperature reads 165°F (74°C) on an instant-read thermometer.
Keep a close eye on the oil temperature between batches. Adding cold chicken drops the oil temp, so give it a minute to climb back to 325°F (165°C) before the next round. Crowding the pot is the biggest thing to avoid here.
The crust should be a rich amber color with no pale patches, and you’ll hear the sizzle stay steady rather than go quiet. If the sizzle dies down significantly, the oil has cooled too much and the coating will absorb oil instead of crisping.
Step 3: Drain and Garnish the Chicken
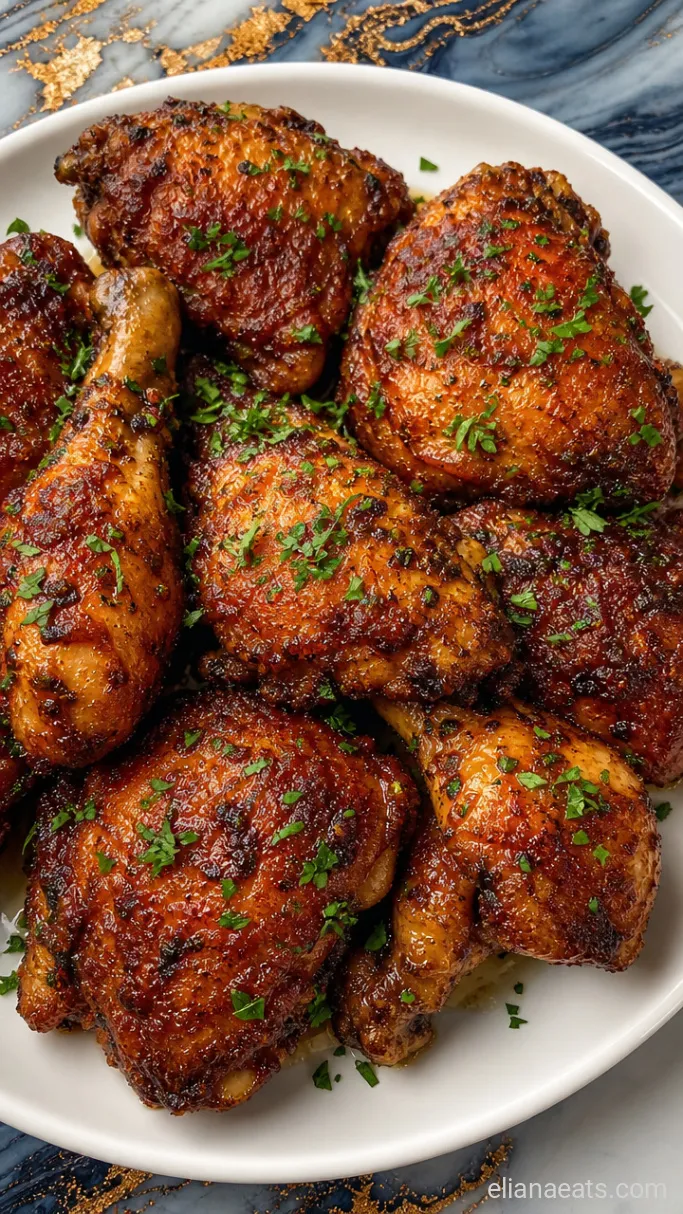
Lift each piece out with tongs and set it back on the wire rack, not on paper towels. Paper towels trap steam underneath and soften the bottom of the crust, while the rack lets air circulate all around. Let the chicken rest on the rack for 3 minutes before serving.
Transfer to a serving platter and finish with a light sprinkle of flaky salt and a few cracks of fresh black pepper over the top.
Recipe Tips
- Dry your chicken thoroughly. Moisture on the surface of the chicken is the main reason coatings turn gluey instead of crisp. A minute with paper towels makes a real difference.
- Use a thermometer. Guessing oil temperature is where most home fry jobs go wrong. Too hot and the coating burns before the meat is cooked; too cool and the whole thing is greasy. A cheap clip-on thermometer is worth it.
- Don’t skip the rest before frying. Those 10 minutes on the rack let the rice flour coating hydrate and grip the chicken properly. Skipping it means coating on the bottom of your pot, not on the chicken.
- Keep finished pieces warm. If you’re frying in batches, hold the done pieces in a 200°F (95°C) oven on the wire rack while you finish the rest. They’ll stay hot and crisp for up to 20 minutes.
Cook times vary by piece size. Check internal temp at the low end of each range:
| Chicken Piece | Oil Temp | Time Per Side |
|---|---|---|
| Drumstick | 325°F (165°C) | 12 min |
| Bone-in thigh | 325°F (165°C) | 14 min |
| Breast (bone-in) | 325°F (165°C) | 14 to 16 min |
| Boneless thigh | 325°F (165°C) | 6 min |
How To Store
- Refrigerate – Store leftover chicken in an airtight container for up to 3 days. Keep the pieces in a single layer if you can; stacking softens the crust.
- Reheating – The best way to bring the crust back is a 375°F (190°C) oven for 12 to 15 minutes on a wire rack. The microwave will make the coating soft and slightly chewy, so use it only if you’re in a rush.
What To Serve With KFC Chicken
A simple coleslaw made with a cider vinegar dressing cuts through the richness of the fried coating in a way that a creamy coleslaw doesn’t quite manage. Gluten free cornbread is a natural match because the slightly sweet crumb works against all that savory spice. If you want something lighter, a cold cucumber and dill salad keeps things from feeling heavy, and the acid in the dressing does the same job as the vinegar slaw.
Frequently Asked Questions
Can I make the coating ahead of time?
Yes. Mix the dry spiced flour up to 2 weeks ahead and keep it in a sealed jar. Just give it a shake before you use it.
Why is my gluten free coating falling off during frying?
It usually means the chicken wasn’t dry enough before coating, or the resting step was skipped. Both of those let the coating grip the surface before it hits the oil.
Can I use chicken breast instead of bone-in pieces?
Bone-in breasts work well at the same times in the table above. Boneless, skinless breasts cook faster, around 5 to 7 minutes per side, and tend to dry out more easily, so pull them the moment the thermometer reads 165°F (74°C).
Can I bake this instead of frying it?
You can bake the coated chicken at 425°F (220°C) on a greased wire rack for 40 to 45 minutes, flipping once at the halfway point. The crust won’t be as crunchy as the fried version, but it’s still quite good.
—
Ingredients
Method
- Whisk together the rice flour, cornstarch, and all spices in a wide shallow bowl. Beat the eggs and milk in a second bowl. Pat the chicken dry, dip each piece in the egg wash, press firmly into the spiced flour, and set on a wire rack. Rest for 10 minutes.
- Heat 3 inches of neutral oil in a heavy pot to 325°F (165°C). Fry the chicken in batches of 2 to 3 pieces, turning once, for 12 to 14 minutes per side until deep golden brown and the internal temperature reaches 165°F (74°C). Return oil to 325°F (165°C) between batches.
- Transfer the fried chicken to the wire rack for 3 minutes, then arrange on a serving platter with a sprinkle of flaky salt and fresh black pepper.