Costco Rotisserie Chicken Copycat Recipe
That golden, juicy Costco rotisserie chicken is one of the best deals in any grocery store, and this copycat recipe gets you the same crispy, well-seasoned skin and tender meat at home. If you want that distinctive savory, lightly smoky flavor on a whole bird any night of the week, this is how you do it.
Make it on a Sunday and you have dinner sorted plus enough leftover chicken for two or three more meals.
Why I Love This Recipe
The skin comes out genuinely crisp because of the salt brine and the high starting heat, not because of any trick ingredient. The seasoning is salty, garlicky, and just a little smoky, which is exactly what makes the original so good.
It’s the version I keep coming back to on weekends when I want something that feels like an occasion but takes maybe 15 minutes of actual work.
Recipe Ingredients

- 1 whole chicken (about 4 lbs / 1.8 kg) – Air-chilled if you can find it; the skin dries out better
- 2 tsp kosher salt – For the dry brine; table salt works but use 1.5 tsp instead
- 1 tsp smoked paprika – This is what gives the skin that familiar reddish color and subtle smokiness
- 1 tsp garlic powder – Not garlic salt; you want control over the sodium
- 1 tsp onion powder – Adds depth without any moisture
- ½ tsp black pepper – Freshly ground if you have it
- ½ tsp dried oregano – Rub it between your fingers first to wake up the flavor
- ¼ tsp cayenne pepper – Just background warmth; leave it out if cooking for kids
- 2 tbsp olive oil – Helps the rub stick and encourages browning
- 1 tbsp unsalted butter, softened – Goes under the breast skin; keeps the white meat from drying out
- 1 medium yellow onion, halved – Goes inside the cavity to add steam and flavor from the inside out
Variations / Substitutions
- Swap smoked paprika for sweet paprika – You lose the smokiness but the color stays; add ¼ tsp cumin to compensate.
- Swap olive oil for avocado oil – Higher smoke point, so the skin gets a little crispier at high heat.
- Swap butter for dairy-free butter – Works the same way under the skin with no noticeable difference in the finished bird.
- Add heat – Double the cayenne to ½ tsp or add ¼ tsp chipotle powder for a smokier heat.
- Swap dried oregano for dried thyme – Slightly more floral, still works with the garlic and paprika.
- Lemon in the cavity – Replace the onion with half a lemon and a few garlic cloves if you want a brighter, more citrusy flavor from the inside.
If you end up with leftover meat, the Costco Rotisserie Chicken Noodle Soup recipe is worth making with the carcass the same night.
How To Make Costco Rotisserie Chicken
Step 1: Season the Chicken
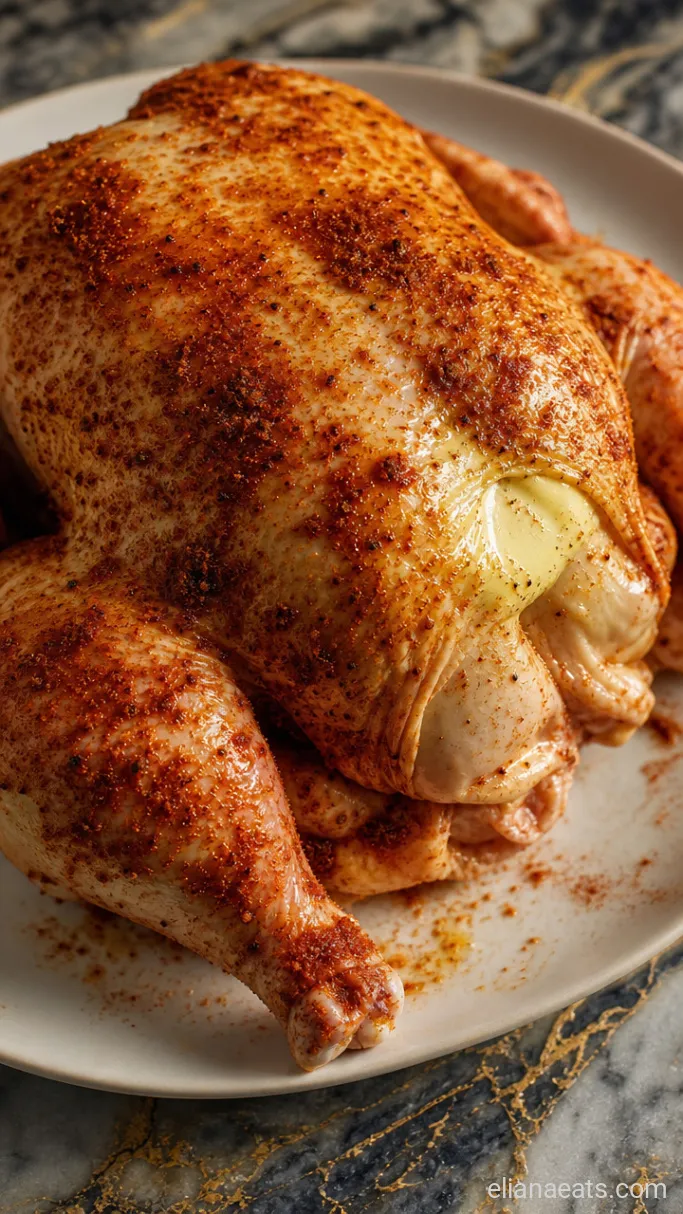
Preheat your oven to 425°F (220°C). Pat the chicken completely dry with paper towels, inside and out. Any moisture on the surface is the enemy of crispy skin, so take an extra minute here.
Mix together the 2 tsp kosher salt, 1 tsp smoked paprika, 1 tsp garlic powder, 1 tsp onion powder, ½ tsp black pepper, ½ tsp dried oregano, and ¼ tsp cayenne in a small bowl. Drizzle the 2 tbsp olive oil over the chicken and rub it all over the bird, then press the spice mixture onto every surface, including under the wings and down the back. Work the 1 tbsp softened butter under the breast skin by sliding your fingers between the skin and the meat, then spreading it evenly across both breasts.
The skin will look dry and coated at this point, almost like a crust before it’s cooked. That’s exactly right. If you have time, leave the seasoned chicken uncovered in the fridge for 1 to 4 hours; even 30 minutes makes a noticeable difference to the skin.
Step 2: Fill the Cavity and Truss
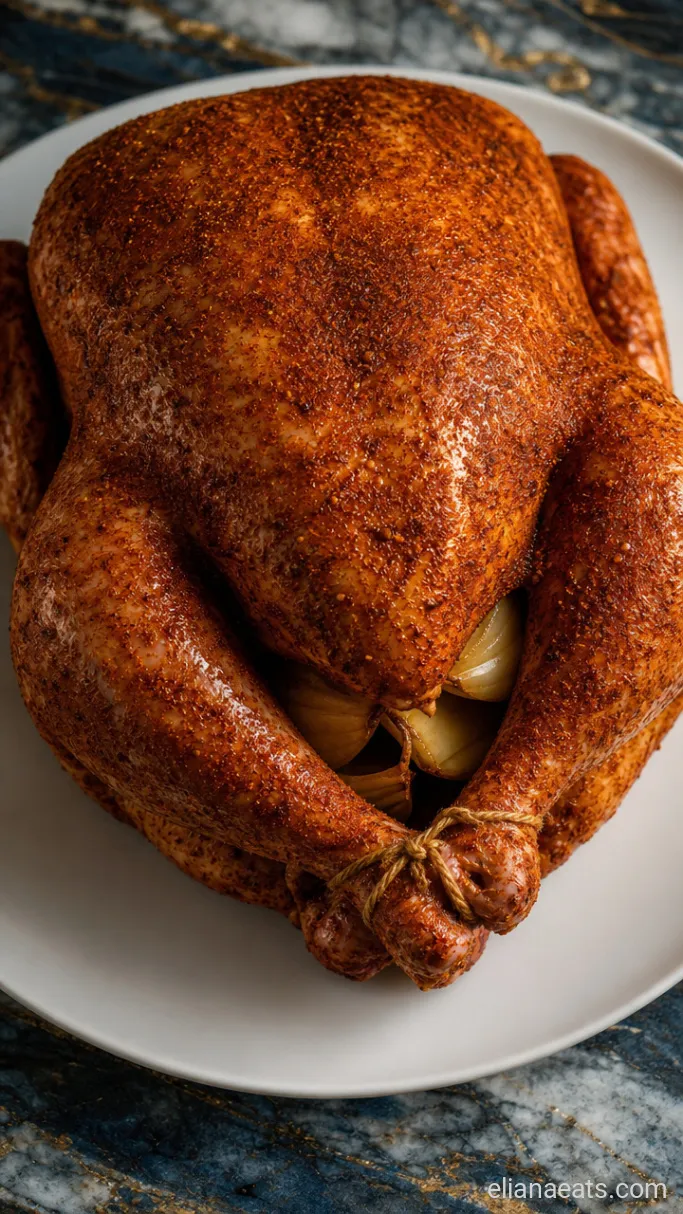
Stuff the halved yellow onion into the cavity. It doesn’t need to be packed tight; the onion is there to flavor the interior and add gentle moisture as it cooks, not to stuff the bird like a holiday turkey.
Tuck the wing tips behind the back of the bird and tie the legs together loosely with kitchen twine if you have it. This helps the chicken cook evenly and keeps the thighs from splaying out and overcooking before the breast is done.
Step 3: Roast the Chicken

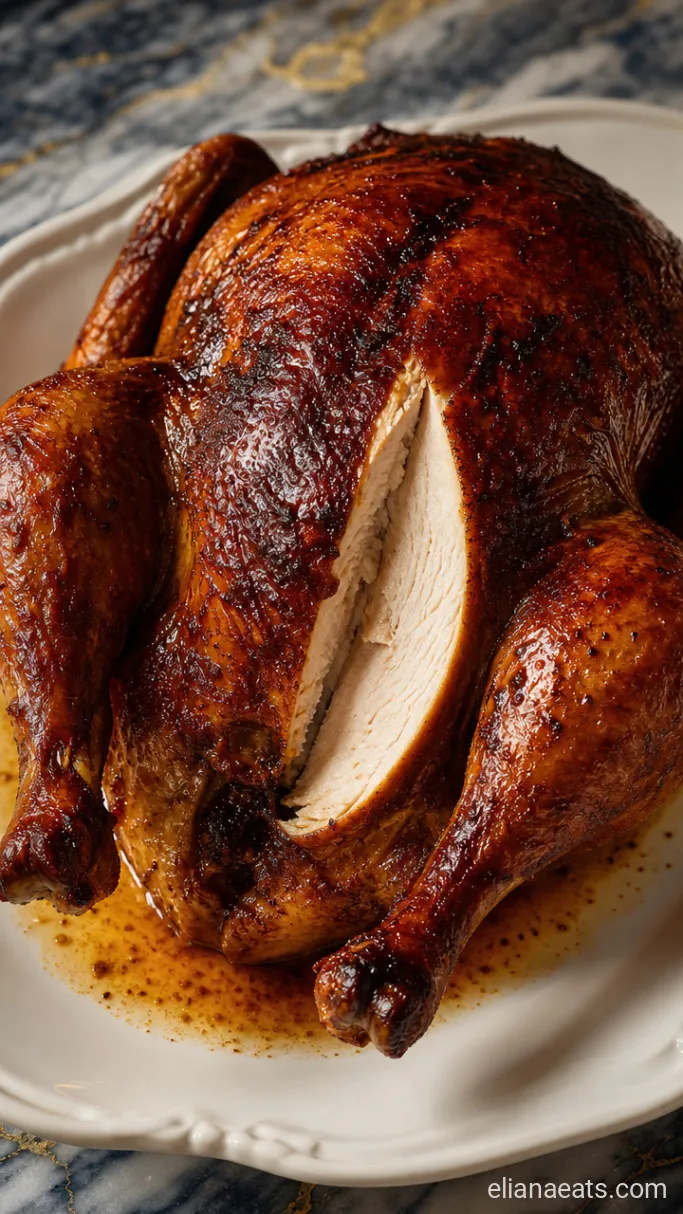
Place the chicken breast-side up on a rack set inside a roasting pan or oven-safe skillet. Roast at 425°F (220°C) for 20 minutes to get the skin browning, then reduce the heat to 375°F (190°C) and continue roasting for another 40 to 50 minutes, depending on the size of your bird.
The chicken is done when the thickest part of the thigh registers 165°F (74°C) on an instant-read thermometer. The skin should be deep amber and feel firm and dry when you press it lightly. If the skin is browning too fast before the internal temp is there, lay a loose piece of foil over the top for the last 15 minutes.
A 4 lb bird typically takes about 60 to 70 minutes total at these temperatures. Don’t pull it early; carryover cooking after you rest it will bring the breast temp up another 3 to 5 degrees.
Step 4: Rest and Carve
Pull the chicken from the oven and let it rest on the rack for 10 minutes before you touch it. This is not optional; cutting into it too soon sends all the juices straight onto the cutting board instead of staying in the meat.
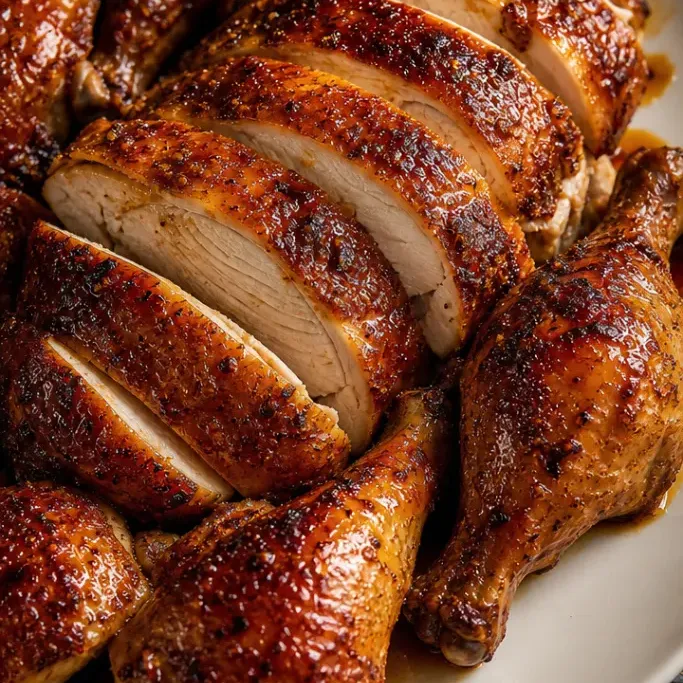
After resting, transfer the chicken to a carving board. Cut away the twine, remove the onion from the cavity, and carve it the way you like, starting with the legs and thighs, then slicing the breasts. The juices that pool on the board are worth spooning back over the slices.
Step 5: Plate and Garnish
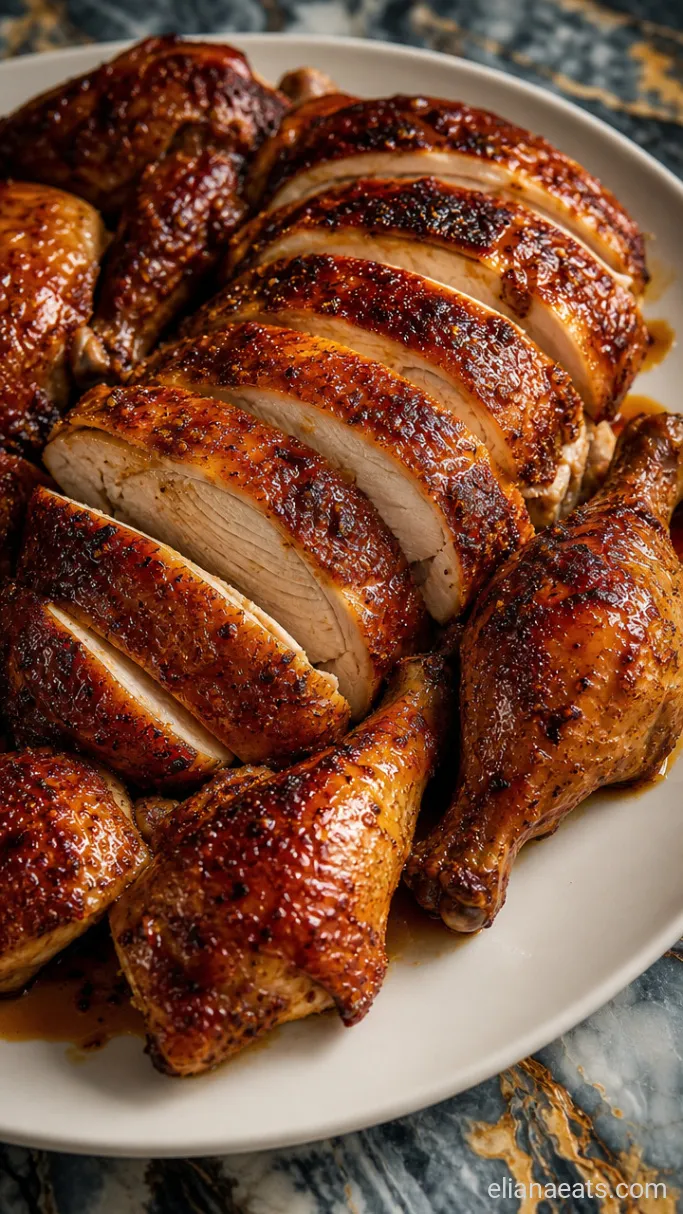
Arrange the carved pieces on a warm platter, skin-side up so the deep amber color stays visible. Spoon any pan drippings from the roasting pan over the top, and finish with a few fresh thyme or parsley sprigs laid alongside. The skin should crack slightly when you press it, and the meat underneath will be white and glossy with juice.
Recipe Tips
- Dry the chicken the night before – If you can season it and leave it uncovered in the fridge overnight, the skin will be noticeably crispier than a same-day bird. The air in the fridge dries the surface out more than paper towels alone can.
- Use a rack – Roasting directly in the pan traps steam under the bird and softens the bottom skin. A rack, even a makeshift one made from rolled-up foil, keeps the heat circulating all the way around.
- Check the temp in the right spot – Insert the thermometer into the thickest part of the thigh, away from the bone. The bone conducts heat and will give you a falsely high reading.
- Save the carcass – Once you’ve carved the bird, drop the bones and any skin into a pot with water, a carrot, a celery stalk, and the onion from the cavity. Simmer for 1 to 2 hours and you have chicken stock for almost nothing.
Cook times by bird weight (at 425°F / 220°C for the first 20 minutes, then 375°F / 190°C):
| Bird Weight | Estimated Total Time | Internal Target |
|---|---|---|
| 3 lbs / 1.4 kg | 50 to 55 mins | 165°F / 74°C |
| 4 lbs / 1.8 kg | 60 to 70 mins | 165°F / 74°C |
| 5 lbs / 2.3 kg | 75 to 85 mins | 165°F / 74°C |
How To Store
- Refrigerate – Store carved leftovers in an airtight container for up to 4 days. Keep the skin separate from any sauce or it will go soft.
- Reheating – Warm slices in a 325°F (165°C) oven for 10 to 12 minutes, loosely covered with foil. The microwave works in a pinch but softens the skin.
- Serve Cold – Cold sliced chicken works well in sandwiches and salads straight from the fridge; no reheating needed.
What To Serve With Costco Rotisserie Chicken
Roasted garlic mashed potatoes are a natural match because the starchy, creamy texture soaks up the pan drippings without competing with the savory, smoky skin. A simple green salad with a sharp vinaigrette cuts through the richness of the dark meat. Roasted vegetables like broccoli or Brussels sprouts cooked in the same oven during the last 20 minutes of the chicken’s roasting time pick up the drippings that fall and taste like they were made for each other.
Frequently Asked Questions
Can I make this without a rack?
Yes, though the bottom skin will steam rather than crisp. Set the chicken on top of thick-cut onion rounds in the pan to keep it elevated slightly.
Can I use chicken pieces instead of a whole bird?
You can, but the timing changes significantly. Bone-in thighs and drumsticks will hit 165°F (74°C) in about 35 to 40 minutes at 400°F (200°C), while bone-in breasts take closer to 45 to 50 minutes.
Does the dry brine have to be done ahead, or can I cook it right away?
You can cook it right away and it will still taste good. The brine just hasn’t had time to penetrate the meat yet, so the flavor will be more on the surface than throughout.
What if my skin isn’t getting crispy?
Your oven temperature is likely lower than it reads. Oven thermostats are notoriously inaccurate. Get an inexpensive oven thermometer, and if the heat is low, bump the set temp up by 25°F (15°C) for the last 15 minutes of cooking.
—
Ingredients
Method
- Preheat oven to 425°F (220°C). Pat the chicken completely dry inside and out. Mix the 2 tsp kosher salt, 1 tsp smoked paprika, 1 tsp garlic powder, 1 tsp onion powder, ½ tsp black pepper, ½ tsp dried oregano, and ¼ tsp cayenne in a small bowl. Rub the 2 tbsp olive oil all over the bird, then press the spice mixture onto every surface. Slide the 1 tbsp softened butter under the breast skin and spread it across both breasts.
- Stuff the halved yellow onion into the cavity. Tuck the wing tips behind the back and tie the legs loosely with kitchen twine.
- Place the chicken breast-side up on a rack in a roasting pan. Roast at 425°F (220°C) for 20 minutes, then reduce to 375°F (190°C) and roast for another 40 to 50 minutes until a thermometer in the thickest part of the thigh reads 165°F (74°C).
- Rest the chicken on the rack for 10 minutes, then transfer to a carving board. Remove the twine and onion, then carve into pieces starting with the legs and thighs, spooning the pan drippings back over the meat.
- Arrange the carved pieces skin-side up on a warm platter, spoon over the pan drippings, and garnish with fresh thyme or parsley sprigs.