18 Prep-Ahead Protein-Rich Snacks for Easy Healthy Days
Busy afternoons call for smart snacking solutions that keep you energized and satisfied. These protein-packed treats are designed to fuel your day without the afternoon crash.
Each recipe can be prepared ahead of time, making healthy choices effortless when hunger strikes between meals.
01. Lemon Ricotta Yogurt Parfait
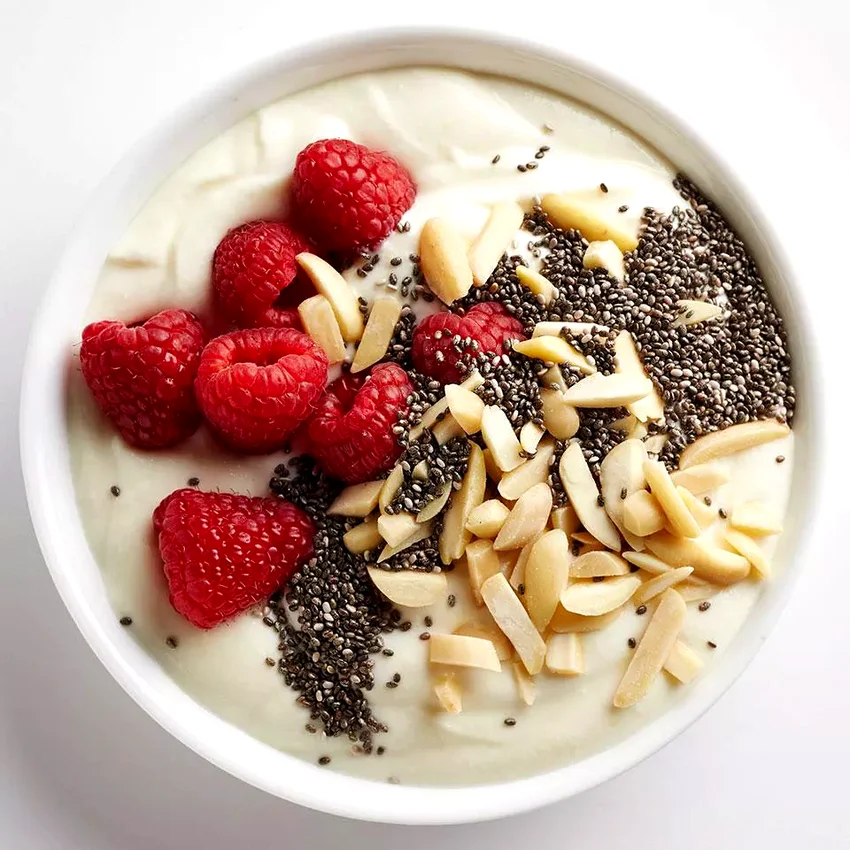
Creamy ricotta and Greek yogurt create a cheesecake-like treat that’s surprisingly healthy. This protein-rich parfait assembles quickly and tastes even better when chilled overnight.
Ingredients: 1 cup whole milk ricotta cheese, ½ cup plain Greek yogurt, 2 tablespoons honey, 1 lemon (zested and juiced), ½ cup fresh berries, ¼ cup chopped almonds, 2 tablespoons chia seeds, pinch of vanilla extract.
How To Make Lemon Ricotta Yogurt Parfait
1. Whisk together ricotta cheese, Greek yogurt, honey, lemon zest, lemon juice, and vanilla extract in a medium bowl until completely smooth and creamy. The mixture should be light and fluffy with bright citrus flavor throughout.
2. Divide the ricotta mixture between two mason jars or containers, filling each about halfway. This creates the perfect base layer for your parfait while leaving room for toppings.
3. Top each jar with fresh berries, chopped almonds, and a sprinkle of chia seeds. Store covered in the refrigerator for up to 3 days, adding the nuts and seeds just before serving to maintain their crunch.
02. Smoky Chipotle Black Bean Dip
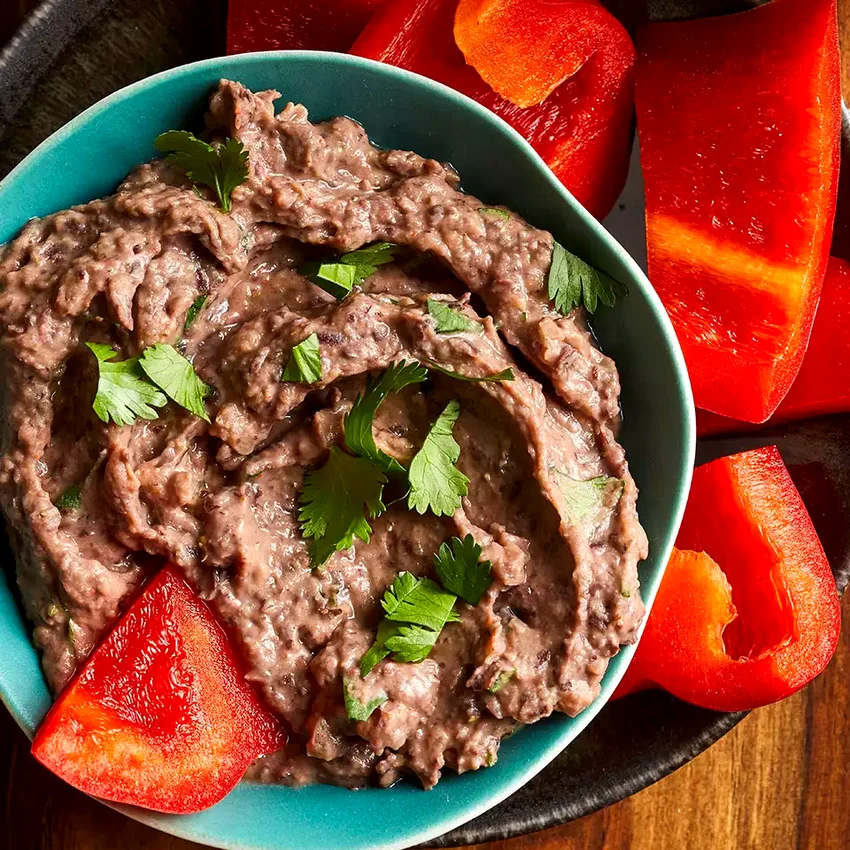
Rich and creamy black bean dip with smoky heat from chipotle peppers. This fiber and protein-packed dip pairs perfectly with vegetables or whole grain crackers for sustained energy.
Ingredients: 2 cans black beans (drained and rinsed), 3 tablespoons olive oil, 2 chipotle peppers in adobo sauce, 1 teaspoon smoked paprika, 3 cloves garlic (minced), 2 tablespoons lime juice, ½ teaspoon cumin, salt and pepper to taste.
How To Make Smoky Chipotle Black Bean Dip
1. Add black beans, olive oil, chipotle peppers, and minced garlic to a food processor. Pulse several times to break down the beans while maintaining some texture for the perfect chunky consistency.
2. Add smoked paprika, cumin, lime juice, salt, and pepper to the food processor. Blend until the mixture reaches your desired smoothness, scraping down sides as needed to ensure even mixing.
3. Taste and adjust seasonings, adding more chipotle for heat or lime juice for brightness. Transfer to an airtight container and refrigerate for at least 30 minutes to allow flavors to meld together beautifully.
4. Store covered in the refrigerator for up to 5 days. The flavors actually improve overnight, making this an ideal make-ahead snack that gets better with time.
03. Cheesy Pizza-Flavored Pistachios
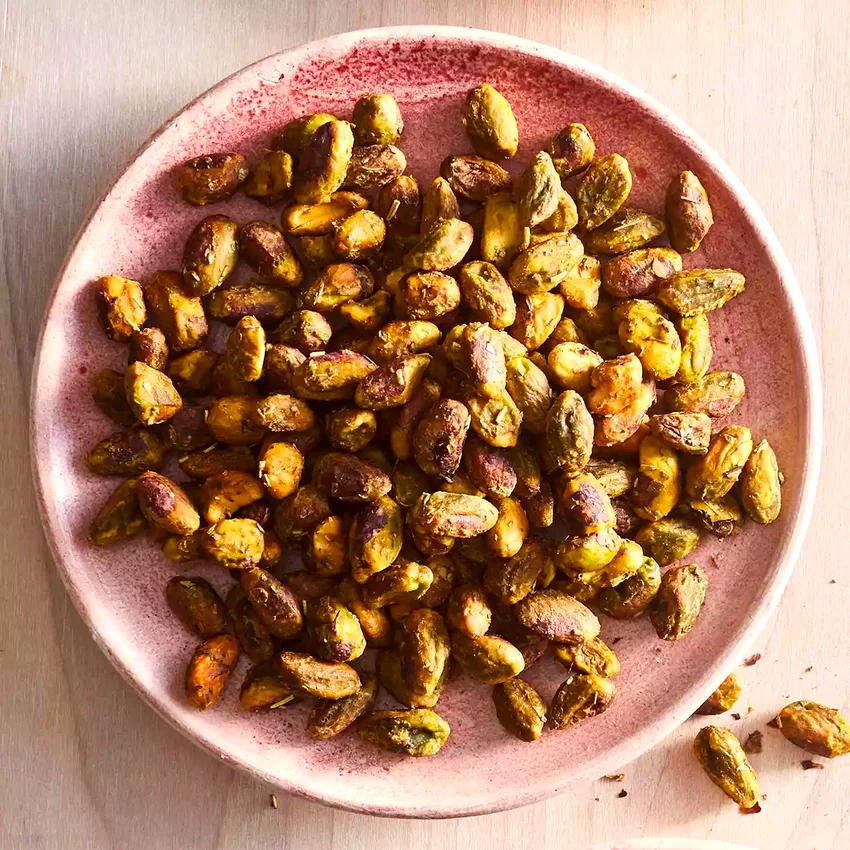
Crunchy roasted pistachios coated with nutritional yeast and Italian herbs for pizza flavor. These addictive nuts deliver plant-based protein and satisfy salty cravings without the guilt.
Ingredients: 2 cups shelled pistachios, 3 tablespoons nutritional yeast, 1 teaspoon dried oregano, 1 teaspoon garlic powder, ½ teaspoon dried basil, ½ teaspoon onion powder, ¼ teaspoon red pepper flakes, 2 tablespoons olive oil, sea salt to taste.
How To Make Cheesy Pizza-Flavored Pistachios
1. Preheat your oven to 325°F and line a baking sheet with parchment paper. This lower temperature ensures the nuts roast evenly without burning the delicate seasonings.
2. Toss pistachios with olive oil in a large bowl until evenly coated. The oil helps all the seasonings stick properly and creates that satisfying crunch when roasted.
3. Mix nutritional yeast, oregano, garlic powder, basil, onion powder, red pepper flakes, and salt in a small bowl. Sprinkle over oiled pistachios and toss thoroughly until every nut is well-coated with the pizza seasoning blend.
4. Spread seasoned pistachios in a single layer on the prepared baking sheet. Roast for 12-15 minutes, stirring once halfway through, until fragrant and lightly golden.
5. Cool completely before storing in an airtight container for up to 2 weeks. These taste best after cooling, when the flavors have settled and the nuts have reached maximum crispiness.
04. Creamy Tahini-Yogurt Dip
Silky smooth tahini blends with tangy Greek yogurt for a protein-rich Middle Eastern inspired dip. This versatile spread works beautifully with fresh vegetables or warm pita bread.
Ingredients: 1 cup plain Greek yogurt, 3 tablespoons tahini, 2 tablespoons lemon juice, 2 cloves garlic (minced), 1 tablespoon honey, 2 tablespoons olive oil, ½ teaspoon ground cumin, salt and pepper to taste, fresh herbs for garnish.
How To Make Creamy Tahini-Yogurt Dip
1. Whisk tahini and lemon juice together in a medium bowl until smooth and creamy. This step is crucial because tahini can be thick and needs the acid to help it blend properly with other ingredients.
2. Add Greek yogurt, minced garlic, honey, olive oil, and cumin to the tahini mixture. Whisk vigorously until completely combined and the dip has a silky, uniform texture throughout.
3. Season with salt and pepper to taste, then transfer to a serving bowl or storage container. Drizzle with extra olive oil and sprinkle with fresh herbs like parsley or mint before serving.
4. Cover and refrigerate for at least 1 hour before serving to allow the flavors to develop. This dip keeps well in the refrigerator for up to 4 days and actually tastes better the next day.
05. Protein-Packed Lemon Blueberry Muffins
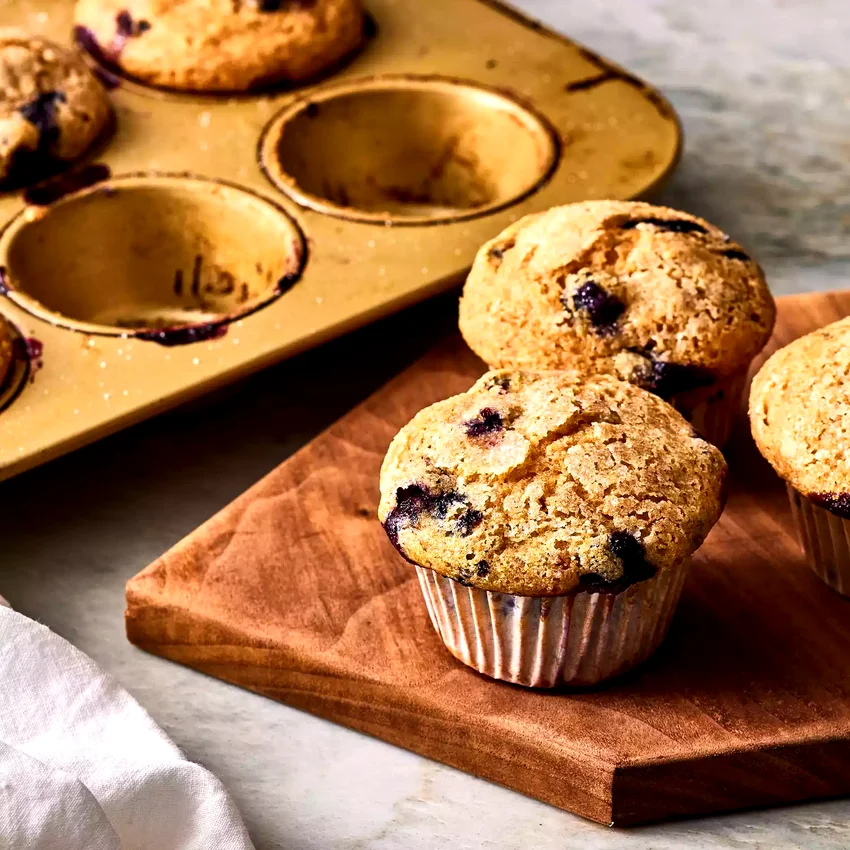
Tender bakery-style muffins loaded with fresh blueberries and boosted with Greek yogurt. These protein-rich treats make perfect grab-and-go snacks that taste like dessert but fuel your body.
Ingredients: 2 cups all-purpose flour, ½ cup vanilla protein powder, ¾ cup sugar, 2 teaspoons baking powder, ½ teaspoon salt, 1 cup plain Greek yogurt, ⅓ cup melted butter, 2 large eggs, 1 lemon (zested and juiced), 1 cup fresh blueberries, 2 tablespoons sugar for topping.
How To Make Protein-Packed Lemon Blueberry Muffins
1. Preheat oven to 375°F and line a 12-cup muffin tin with paper liners. This temperature creates the perfect dome top while keeping the interior moist and tender throughout.
2. Whisk flour, protein powder, sugar, baking powder, and salt in a large bowl. Make sure the protein powder is evenly distributed to avoid any chalky pockets in your finished muffins.
3. Combine Greek yogurt, melted butter, eggs, lemon zest, and lemon juice in a separate bowl. Whisk until smooth and creamy, ensuring the eggs are completely incorporated for even texture.
4. Gently fold the wet ingredients into the dry ingredients until just combined. Don’t overmix, as this can make the muffins tough and dense instead of light and fluffy.
5. Fold in fresh blueberries carefully to avoid bursting them. Divide batter evenly among muffin cups, filling each about ¾ full, then sprinkle tops with remaining sugar for a beautiful golden crust.
6. Bake for 22-25 minutes until tops are golden brown and a toothpick inserted in the center comes out with just a few moist crumbs attached. Cool in pan for 5 minutes before transferring to a wire rack.
06. Chocolate Peanut Butter Yogurt Cups
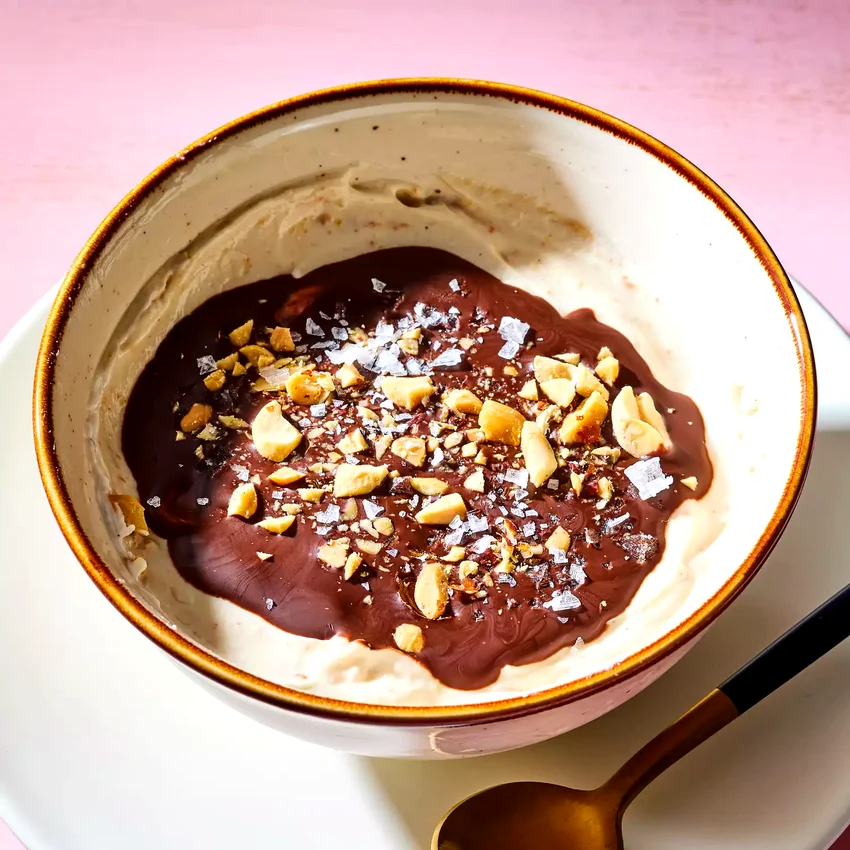
Creamy peanut butter yogurt topped with a crispy chocolate shell that hardens like magic. This high-protein snack tastes exactly like your favorite candy but provides lasting energy and nutrition.
Ingredients: 2 cups vanilla Greek yogurt, ¼ cup natural peanut butter, 2 tablespoons honey, ¼ cup dark chocolate chips, 2 tablespoons coconut oil, pinch of sea salt, chopped peanuts for garnish.
How To Make Chocolate Peanut Butter Yogurt Cups
1. Mix Greek yogurt, peanut butter, and honey in a bowl until completely smooth and creamy. The mixture should be thick enough to hold its shape but still spoonable and delicious.
2. Divide the peanut butter yogurt mixture between 4 small cups or jars, smoothing the tops with a spoon. Place in the freezer for 15 minutes to firm up before adding the magic shell topping.
3. Melt chocolate chips and coconut oil together in the microwave in 30-second intervals, stirring between each interval until completely smooth and glossy. The mixture should pour easily but not be too hot.
4. Remove yogurt cups from freezer and quickly spoon the warm chocolate mixture over each cup. The chocolate will harden almost immediately when it hits the cold yogurt, creating that satisfying crack when you break through with your spoon.
5. Sprinkle with chopped peanuts and a pinch of sea salt while the chocolate is still slightly soft. Return to refrigerator for 10 minutes to fully set before enjoying this protein-packed treat.
07. Banana Peanut Butter Parfait
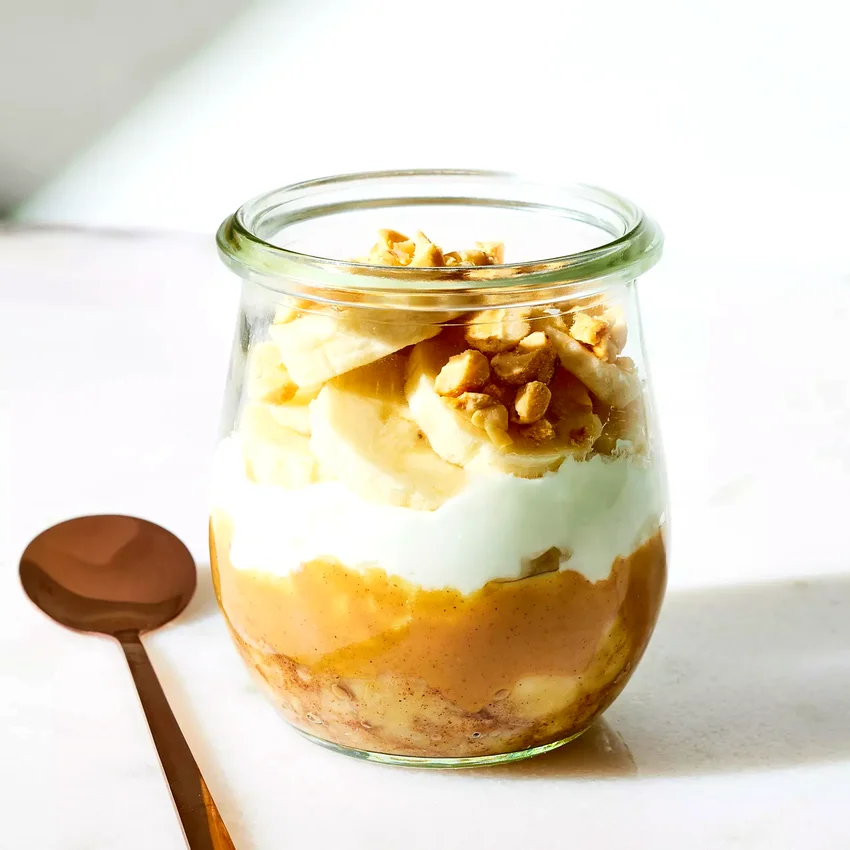
Classic banana and peanut butter combination layered with protein-rich Greek yogurt. This satisfying parfait provides healthy fats, natural sweetness, and sustained energy for busy afternoons.
Ingredients: 2 cups vanilla Greek yogurt, 3 tablespoons natural peanut butter, 2 tablespoons honey, 2 ripe bananas (sliced), ¼ cup granola, 2 tablespoons chopped peanuts, 1 tablespoon chia seeds, cinnamon for dusting.
How To Make Banana Peanut Butter Parfait
1. Whisk Greek yogurt, peanut butter, and honey together in a bowl until smooth and creamy. The peanut butter should be completely incorporated without any streaks or lumps remaining.
2. Slice bananas into rounds just before assembling to prevent browning. Layer half the peanut butter yogurt mixture in the bottom of two mason jars or glasses.
3. Add a layer of sliced bananas over the yogurt, followed by a sprinkle of granola and chopped peanuts. The different textures create an exciting contrast in every bite.
4. Repeat layers with remaining yogurt mixture and banana slices. Top with final sprinkle of granola, peanuts, chia seeds, and a light dusting of cinnamon for extra warmth and flavor.
5. Serve immediately for best texture, or refrigerate for up to 2 hours. Add the granola just before eating to maintain its satisfying crunch against the creamy yogurt base.
08. Cottage Cheese Power Jar
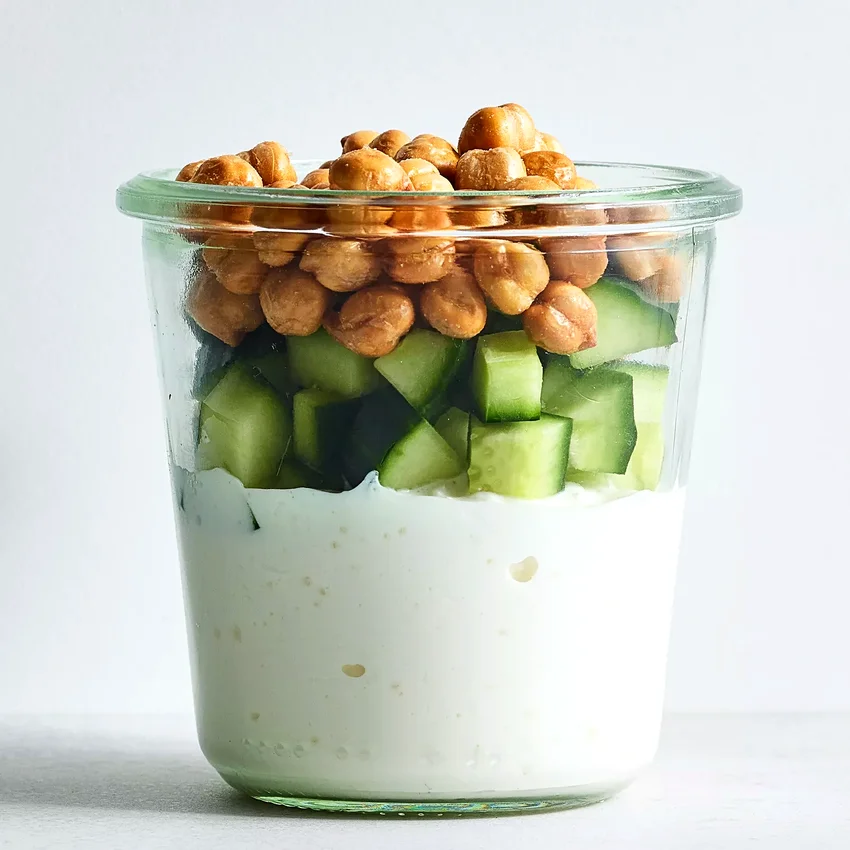
Creamy cottage cheese layered with crunchy vegetables and chickpeas for texture. This protein powerhouse delivers 20 grams of protein and keeps you satisfied for hours between meals.
Ingredients: 1 cup cottage cheese, ¼ cup roasted chickpeas, ¼ cup diced cucumber, ¼ cup cherry tomatoes (halved), 2 tablespoons sunflower seeds, 1 tablespoon olive oil, 1 teaspoon everything bagel seasoning, salt and pepper to taste.
How To Make Cottage Cheese Power Jar
1. Layer cottage cheese in the bottom of a mason jar, creating a smooth, even base. The cottage cheese provides the protein foundation that makes this snack so satisfying and nutritious.
2. Dice cucumber and halve cherry tomatoes, then layer them over the cottage cheese. These fresh vegetables add crunch and vitamins while keeping the snack light and refreshing.
3. Top with roasted chickpeas and sunflower seeds for extra protein and satisfying crunch. Store the crunchy toppings separately if making ahead to prevent them from getting soggy.
4. Drizzle with olive oil and sprinkle everything bagel seasoning over the top just before eating. This adds healthy fats and tons of flavor to transform simple cottage cheese into something special and delicious.
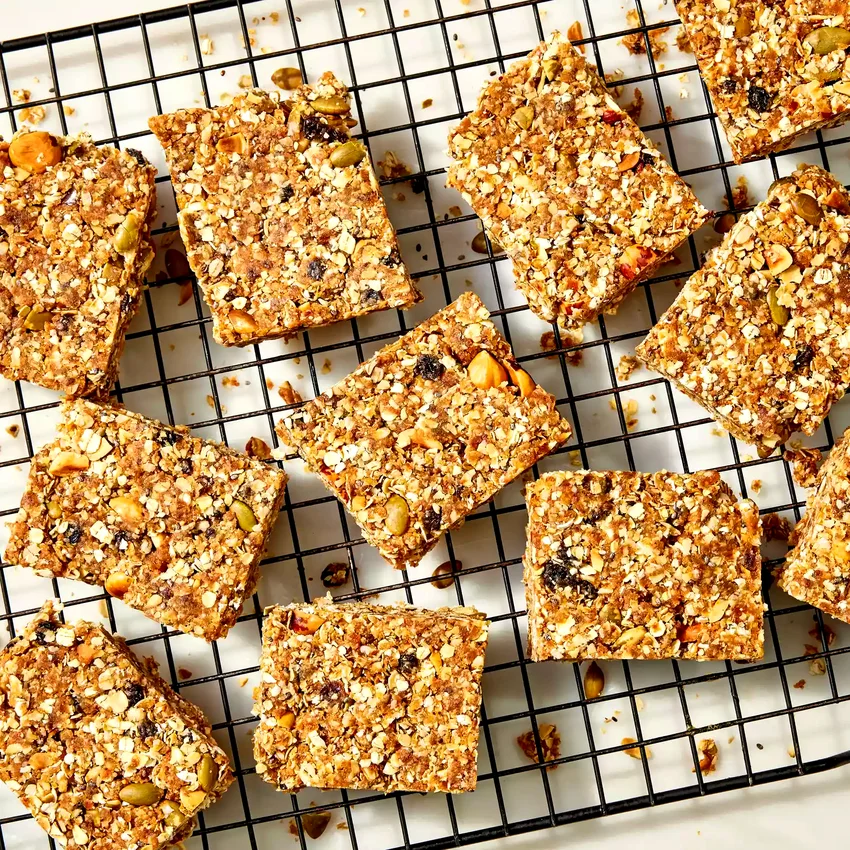
09. Spiced Carrot Cake Oat Bars
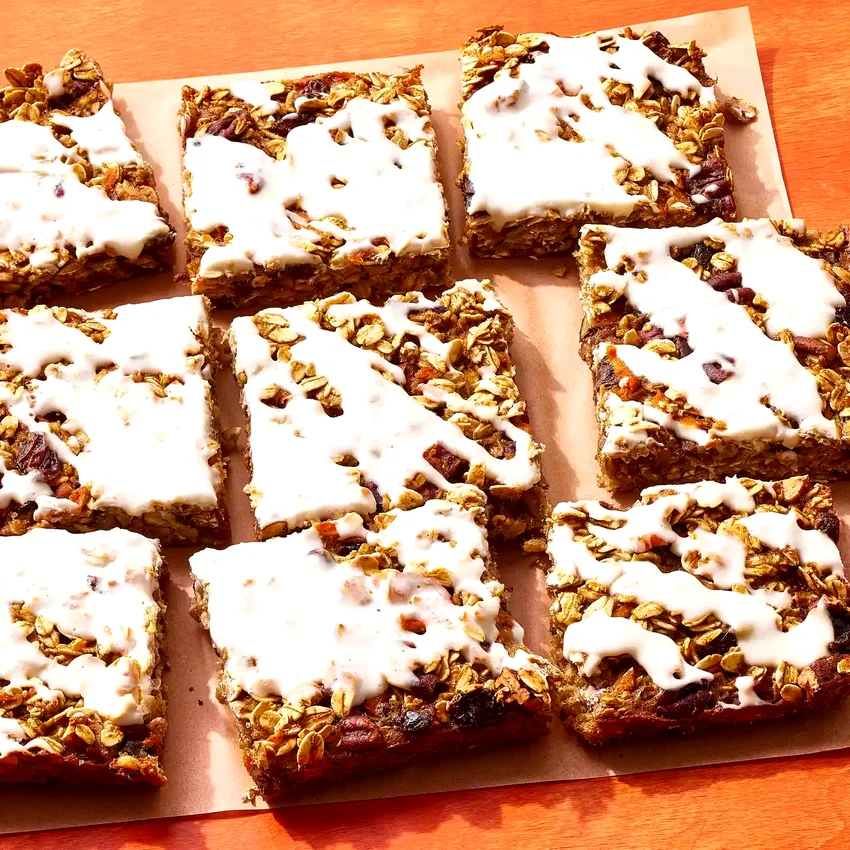
Chewy oat bars packed with shredded carrots and warm spices like cinnamon and nutmeg. These fiber-rich treats capture all the flavors of carrot cake with less sugar and more nutrition.
Ingredients: 2 cups old-fashioned oats, 1 cup finely shredded carrots, ⅓ cup brown sugar, ¼ cup honey, ⅓ cup almond butter, 1 teaspoon cinnamon, ½ teaspoon nutmeg, ¼ teaspoon ginger, 2 tablespoons chia seeds, ¼ cup chopped walnuts, pinch of salt.
How To Make Spiced Carrot Cake Oat Bars
1. Preheat oven to 350°F and line an 8×8 inch baking pan with parchment paper, leaving overhang for easy removal. This size pan creates perfectly thick bars that hold together beautifully when cut.
2. Mix oats, shredded carrots, brown sugar, cinnamon, nutmeg, ginger, chia seeds, chopped walnuts, and salt in a large bowl. Toss everything together until the spices are evenly distributed throughout.
3. Warm honey and almond butter together in the microwave for 30 seconds until easy to stir. This helps bind all the ingredients together and creates that perfect chewy texture.
4. Pour the warm honey mixture over the oat mixture and stir thoroughly until everything is well-coated and holds together when pressed. The mixture should feel slightly sticky but not wet.
5. Press the mixture firmly into the prepared pan using the back of a spoon or your hands. Make sure it’s evenly distributed and well-compressed so the bars don’t crumble when cut.
6. Bake for 25-30 minutes until the edges are lightly golden brown. Cool completely in the pan before lifting out and cutting into 12 bars. Store covered for up to one week.
10. Crunchy Roasted Squash Seeds
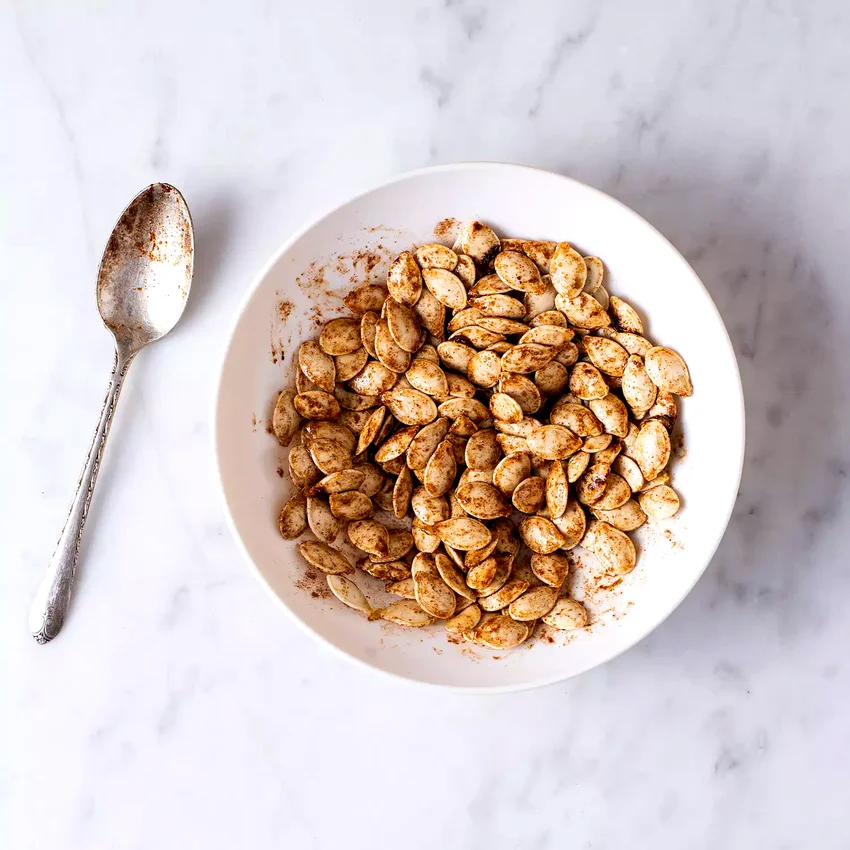
Don’t waste those nutritious spaghetti squash seeds when you’re cooking dinner. Transform them into a crunchy, protein-rich snack that’s perfect for munching or adding to salads for extra texture.
Ingredients: 1 cup spaghetti squash seeds, 1 tablespoon olive oil, 1 teaspoon garlic powder, ½ teaspoon smoked paprika, ½ teaspoon sea salt, ¼ teaspoon black pepper, pinch of cayenne pepper.
How To Make Crunchy Roasted Squash Seeds
1. Clean the squash seeds by removing all pulp and strings under cold running water. Pat them completely dry with paper towels, as any remaining moisture will prevent them from getting crispy during roasting.
2. Preheat oven to 300°F and line a baking sheet with parchment paper. This lower temperature ensures the seeds cook evenly and become perfectly crunchy without burning the seasonings.
3. Toss dried seeds with olive oil in a bowl until evenly coated. Mix garlic powder, smoked paprika, salt, pepper, and cayenne in a small bowl, then sprinkle over the oiled seeds.
4. Spread seeds in a single layer on the prepared baking sheet. Roast for 20-25 minutes, stirring every 10 minutes, until golden brown and crispy throughout.
5. Cool completely before storing in an airtight container for up to 1 week. These make a great crunchy topping for soups and salads, or enjoy them as a healthy alternative to chips.
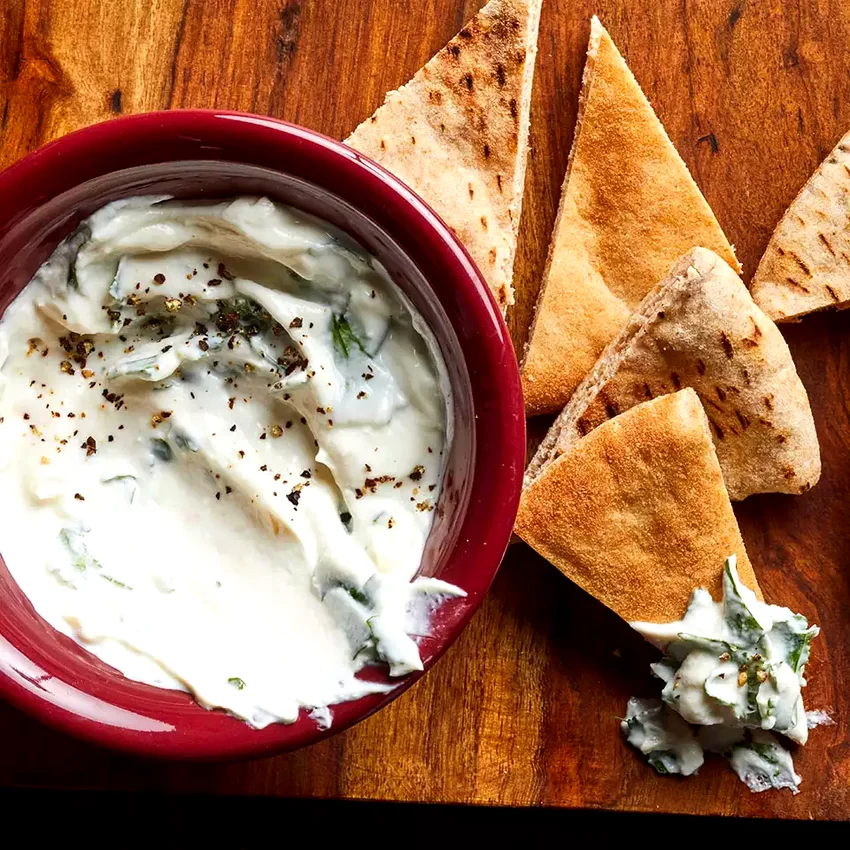
11. Herbed Ricotta Veggie Jar
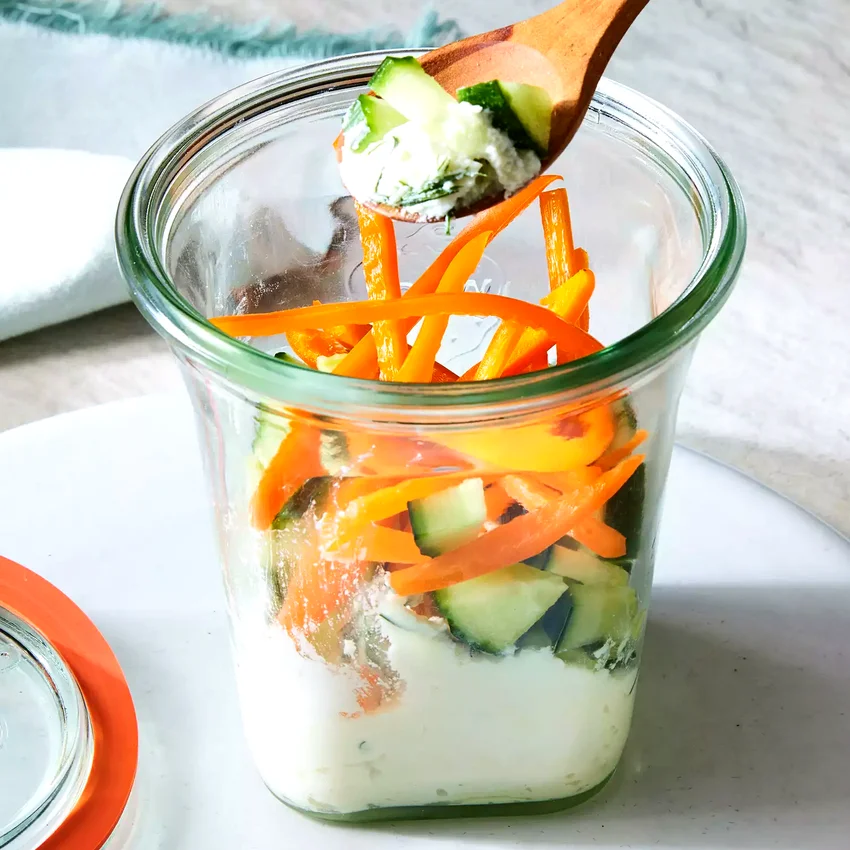
Fresh herbs transform creamy ricotta cheese into an elegant dip for crisp vegetables. This protein-rich snack jar is perfect for afternoon munching and provides satisfying nutrition without heaviness.
Ingredients: 1 cup whole milk ricotta cheese, 2 tablespoons fresh dill (chopped), 1 tablespoon fresh chives (chopped), 1 cucumber (sliced), 1 cup mini bell peppers, 2 tablespoons olive oil, 1 lemon (juiced), salt and pepper to taste.
How To Make Herbed Ricotta Veggie Jar
1. Mix ricotta cheese with chopped dill, chives, olive oil, and lemon juice in a bowl. Season with salt and pepper, stirring until the herbs are evenly distributed and the mixture is smooth and creamy.
2. Spoon the herbed ricotta mixture into the bottom of mason jars, creating a thick layer that will serve as your protein-rich dip base for all the fresh vegetables.
3. Slice cucumber into rounds and arrange mini bell peppers around the ricotta. The vegetables should be easy to grab and perfect for scooping up the creamy, herb-infused ricotta mixture.
4. Cover and refrigerate for up to 3 days. The flavors actually improve as they sit, making this an ideal make-ahead snack that gets more delicious over time.
12. Peachy Cottage Cheese Jar
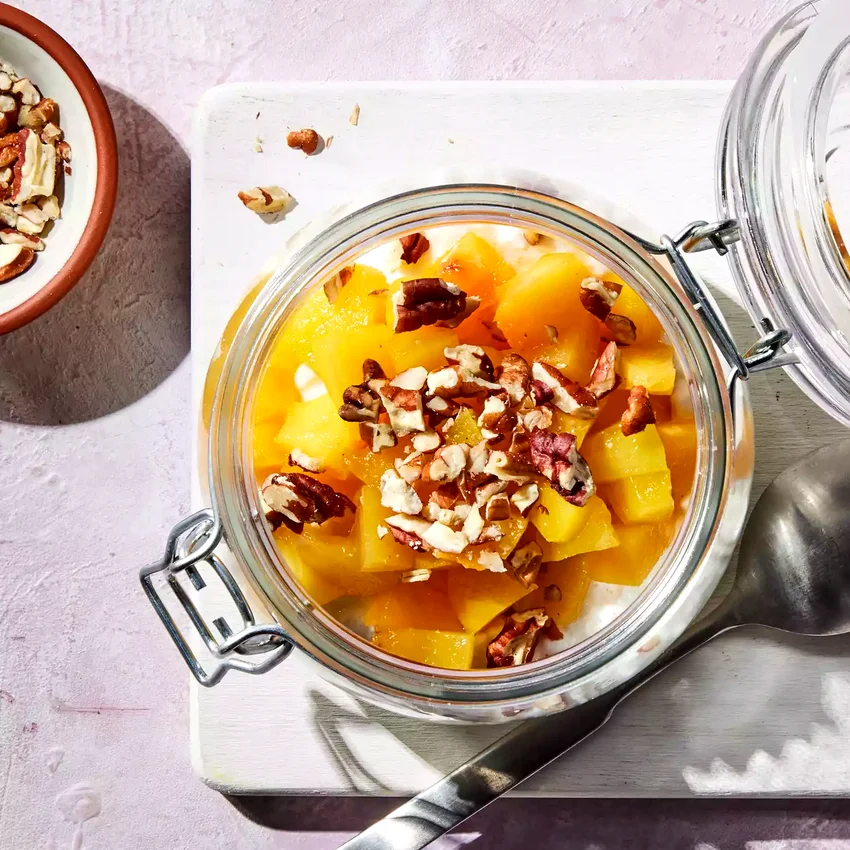
Sweet, juicy peaches paired with protein-packed cottage cheese create a satisfying snack reminiscent of peaches and cream. A hint of vanilla and cinnamon elevates this simple combination into something special.
Ingredients: 1 cup cottage cheese, 1 large ripe peach (diced), 1 tablespoon honey, ½ teaspoon vanilla extract, ¼ teaspoon cinnamon, 2 tablespoons chopped almonds, 1 tablespoon chia seeds.
How To Make Peachy Cottage Cheese Jar
1. Dice the ripe peach into small, bite-sized pieces that will mix well with the cottage cheese. Choose a peach that’s fragrant and gives slightly to pressure for the best sweet flavor.
2. Stir honey, vanilla extract, and cinnamon into the cottage cheese until well combined. This transforms plain cottage cheese into something that tastes like a dessert while maintaining all the protein benefits.
3. Gently fold the diced peaches into the flavored cottage cheese mixture, being careful not to mash the fruit. You want distinct pieces of peach in every spoonful for the best texture and flavor.
4. Transfer to jars and top with chopped almonds and chia seeds for extra crunch and nutrition. These toppings add healthy fats and fiber while creating textural interest in every bite.
5. Chill for at least 30 minutes before serving to allow the flavors to meld together beautifully. This snack is best enjoyed within 2 days while the peaches are still fresh and flavorful.
13. No-Bake Coconut Cashew Bites
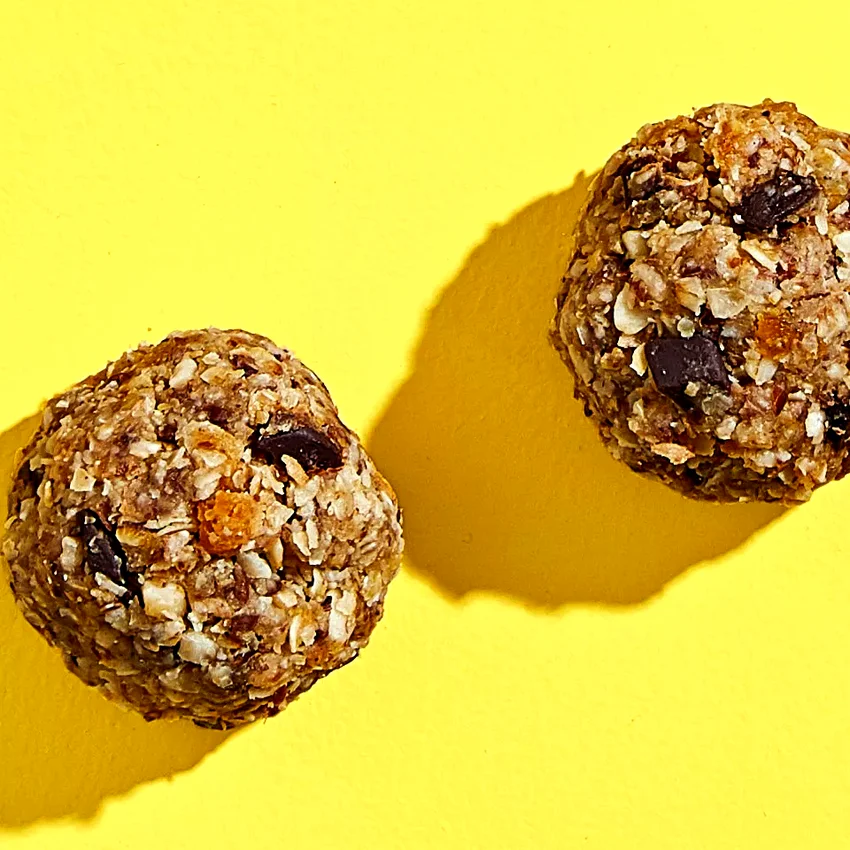
Sweet dates and creamy cashews blend with coconut for naturally energizing bites. These no-bake treats store perfectly in the freezer and provide quick fuel whenever you need an energy boost.
Ingredients: 1 cup raw cashews, 1 cup pitted dates, ½ cup unsweetened shredded coconut, 2 tablespoons almond butter, 1 teaspoon vanilla extract, pinch of sea salt, extra coconut for rolling.
How To Make No-Bake Coconut Cashew Bites
1. Soak cashews in warm water for 15 minutes to soften them, then drain thoroughly. This step ensures they blend smoothly and create the perfect creamy texture for binding all ingredients together.
2. Add dates to a food processor and pulse until they form a sticky paste. The dates should be completely broken down and form the sweet, binding base for your energy bites.
3. Add drained cashews, shredded coconut, almond butter, vanilla, and salt to the food processor with the date paste. Process until the mixture holds together when pressed but still has some texture from the nuts.
4. Roll the mixture into 12 small balls using your hands, pressing firmly to ensure they hold their shape. If the mixture is too sticky, chill for 15 minutes before rolling.
5. Roll each ball in extra shredded coconut for a beautiful finish and added texture. Store in the refrigerator for up to 1 week or freeze for up to 3 months for grab-and-go convenience.
14. Spicy Sweet Roasted Mixed Nuts
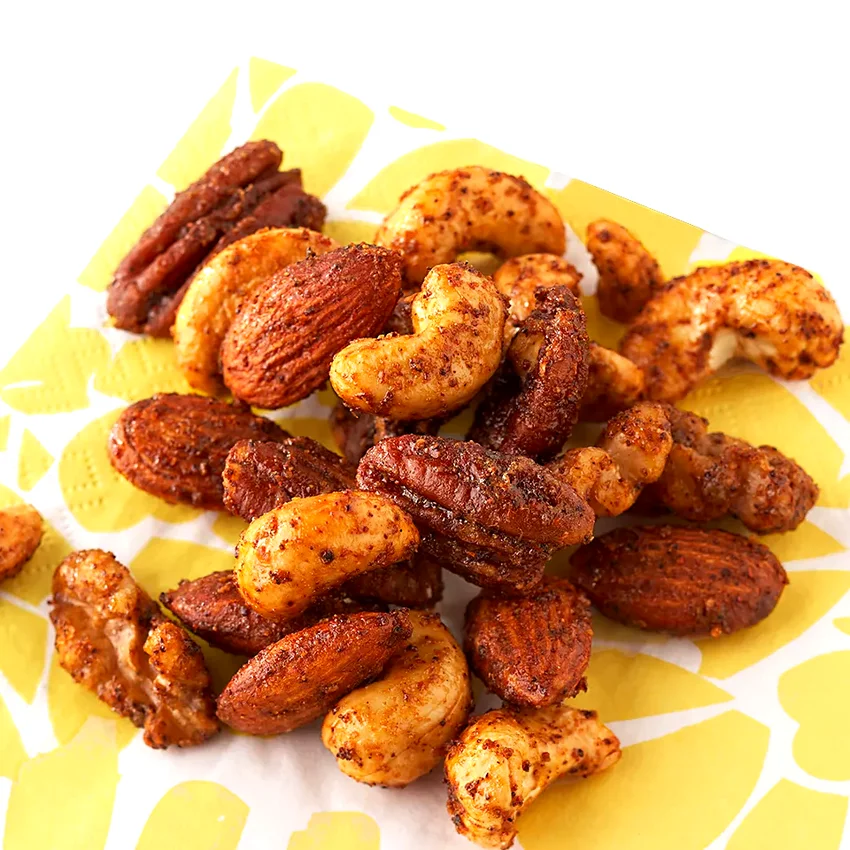
A perfect balance of sweet and spicy transforms ordinary mixed nuts into an irresistible snack. These protein-rich nuts are ideal for parties or portion into small containers for weekly snack prep.
Ingredients: 2 cups mixed raw nuts, 2 tablespoons maple syrup, 1 tablespoon olive oil, 1 teaspoon chili powder, ½ teaspoon cumin, ½ teaspoon smoked paprika, ¼ teaspoon cayenne pepper, 1 teaspoon sea salt.
How To Make Spicy Sweet Roasted Mixed Nuts
1. Preheat oven to 325°F and line a large baking sheet with parchment paper. This moderate temperature allows the nuts to roast evenly while the maple syrup caramelizes without burning.
2. Toss mixed nuts with maple syrup and olive oil in a large bowl until evenly coated. The maple syrup adds sweetness while helping all the spices adhere properly to each nut.
3. Combine chili powder, cumin, smoked paprika, cayenne pepper, and sea salt in a small bowl. Sprinkle the spice mixture over the coated nuts and toss thoroughly until every nut is well-seasoned.
4. Spread seasoned nuts in a single layer on the prepared baking sheet, ensuring they don’t overlap. Roast for 15-20 minutes, stirring every 5 minutes, until fragrant and lightly caramelized.
5. Cool completely on the baking sheet before storing in airtight containers for up to 2 weeks. The nuts will continue to crisp up as they cool, developing the perfect crunchy texture.
15. Pumpkin Spice Energy Bites
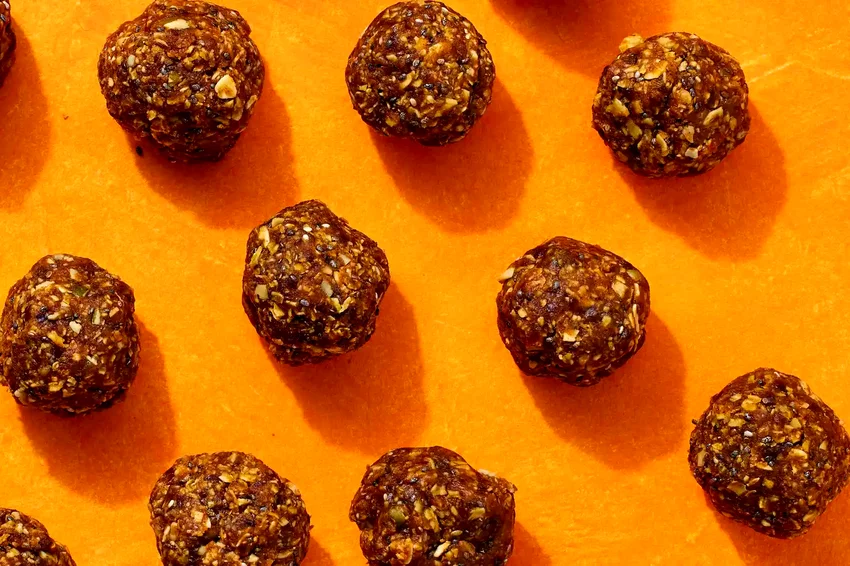
Warm pumpkin pie spices blend with nuts and seeds in these chewy energy balls. Each bite delivers autumn flavors with satisfying crunch from pepitas and pecans throughout the creamy pumpkin base.
Ingredients: 1 cup pitted dates, ½ cup pumpkin puree, ½ cup raw pecans, ¼ cup pepitas, 2 tablespoons almond butter, 1 teaspoon pumpkin pie spice, ½ teaspoon vanilla extract, 2 tablespoons chia seeds, pinch of salt.
How To Make Pumpkin Spice Energy Bites
1. Process dates in a food processor until they form a sticky paste that will bind all the other ingredients together. Make sure no large pieces remain, as this could cause the energy bites to fall apart.
2. Add pumpkin puree, almond butter, pumpkin pie spice, vanilla, and salt to the food processor with the date paste. Pulse until well combined and the mixture is smooth and cohesive.
3. Add pecans, pepitas, and chia seeds to the mixture and pulse briefly just to break up the nuts slightly while maintaining some chunky texture for interesting bites throughout each ball.
4. Chill the mixture in the refrigerator for 30 minutes to firm up, making it much easier to handle and roll into uniform balls without sticking to your hands.
5. Roll the chilled mixture into 14 small balls, pressing firmly to ensure they hold together well. Store in the refrigerator for up to 1 week or freeze for longer storage.
16. Everything Bagel Seasoned Almonds
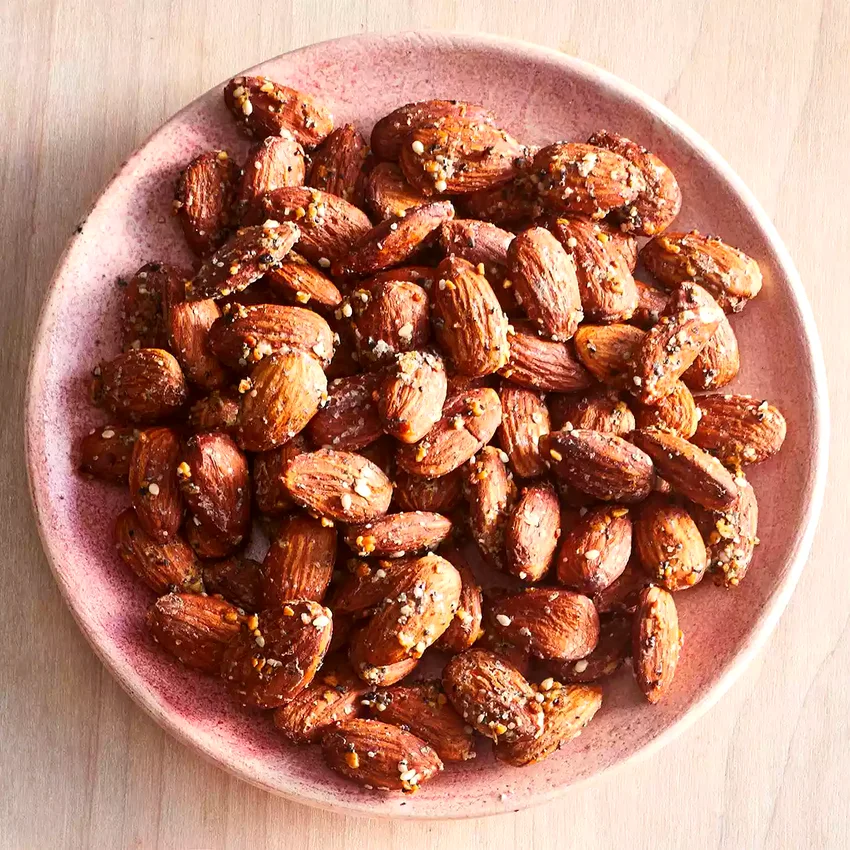
Crunchy roasted almonds coated with popular everything bagel seasoning blend. Grinding the seasoning helps it stick better and creates an even coating that delivers maximum flavor in every single bite.
Ingredients: 2 cups raw almonds, 3 tablespoons everything bagel seasoning, 2 tablespoons olive oil, 1 teaspoon garlic powder, ½ teaspoon onion powder, extra sea salt to taste.
How To Make Everything Bagel Seasoned Almonds
1. Preheat oven to 325°F and line a baking sheet with parchment paper. This temperature ensures the almonds roast evenly while preventing the delicate seasoning blend from burning.
2. Grind the everything bagel seasoning in a spice grinder or mortar and pestle until it becomes a fine powder. This crucial step helps the seasoning adhere much better to the almonds.
3. Toss almonds with olive oil in a large bowl until evenly coated. Add the ground seasoning blend, garlic powder, and onion powder, stirring thoroughly until every almond is well-coated.
4. Spread seasoned almonds in a single layer on the prepared baking sheet. Roast for 12-15 minutes, stirring once halfway through, until fragrant and lightly golden brown.
5. Cool completely before tasting and adjusting salt if needed. Store in an airtight container for up to 2 weeks, though they’re so delicious they probably won’t last that long.
17. No-Bake Peanut Butter Date Bars
Chewy homemade granola bars held together with natural sweetness from dates and creamy peanut butter. These no-bake bars are incredibly easy to make and provide sustained energy without refined sugar.
Ingredients: 2 cups old-fashioned oats, 1 cup pitted dates, ½ cup natural peanut butter, ¼ cup agave syrup, ¼ cup chopped peanuts, 2 tablespoons chia seeds, 1 teaspoon vanilla extract, ½ teaspoon cinnamon, pinch of salt.
How To Make No-Bake Peanut Butter Date Bars
1. Line an 8×8 inch pan with parchment paper, leaving overhang for easy removal. Process dates in a food processor until they form a smooth, sticky paste that will act as the natural binding agent.
2. Add peanut butter, agave syrup, vanilla, cinnamon, and salt to the food processor with the date paste. Process until completely smooth and well combined into a cohesive mixture.
3. Transfer the date mixture to a large bowl and stir in oats, chopped peanuts, and chia seeds. Mix thoroughly until everything is evenly coated and the mixture holds together when pressed.
4. Press the mixture firmly into the prepared pan using the back of a spoon or your hands. Make sure it’s evenly distributed and well-compressed so the bars won’t crumble when cut.
5. Refrigerate for at least 2 hours until firm, then lift out using the parchment overhang and cut into 12 bars. Store covered in the refrigerator for up to 1 week.
18. Apple Pie Protein Baked Oats
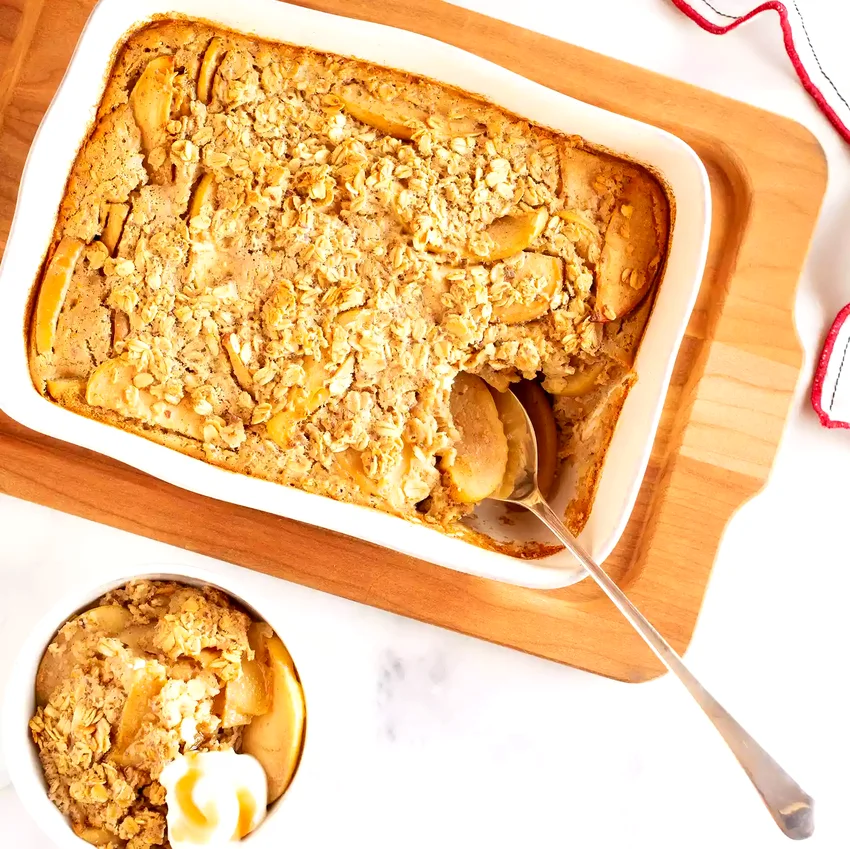
Warm baked oats with tender apple pieces and cozy cinnamon spice flavors. Vanilla protein powder adds extra staying power to this comforting snack that tastes like apple pie but fuels your body.
Ingredients: 1 cup old-fashioned oats, 1 scoop vanilla protein powder, 1 large apple (diced), 1 cup unsweetened almond milk, 1 large egg, 2 tablespoons maple syrup, 1 teaspoon cinnamon, ¼ teaspoon nutmeg, 1 teaspoon vanilla extract, pinch of salt.
How To Make Apple Pie Protein Baked Oats
1. Preheat oven to 350°F and grease an 8×8 inch baking dish with cooking spray. This size creates perfectly thick slices that hold together beautifully and provide satisfying portions.
2. Whisk together oats, protein powder, cinnamon, nutmeg, and salt in a large bowl. Make sure the protein powder is evenly distributed to prevent any chalky pockets in the finished baked oats.
3. Beat egg in a separate bowl, then whisk in almond milk, maple syrup, and vanilla extract until smooth. This wet mixture will bind everything together and create that perfect custard-like texture.
4. Fold the wet ingredients into the oat mixture along with the diced apple pieces. Stir gently until just combined, being careful not to overmix which could make the texture dense.
5. Pour the mixture into the prepared baking dish and spread evenly. Bake for 35-40 minutes until the top is golden brown and the center is set but still slightly soft.
6. Cool for 10 minutes before slicing into 9 squares. These taste delicious warm or cold and store covered in the refrigerator for up to 4 days, perfect for grab-and-go snacking.
Final Thoughts
These protein-rich snacks prove that healthy eating doesn’t mean sacrificing flavor or satisfaction. Each recipe offers make-ahead convenience that fits perfectly into busy lifestyles.
With options ranging from sweet energy bites to savory seasoned nuts, you’ll always have nutritious fuel ready when afternoon hunger strikes unexpectedly.